Tuesday, January 31, 2012

Honey Salted Caramels

I’m a dessert kind of person – I feel like a meal just isn’t complete without a little bit of sweetness to cap it off. I don’t need a big slice of pie or scoop of ice cream after every meal, but I do appreciate a little taste of something sweet after dinner to signify the meal is over. Chocolate is fine but mostly what I want is candy. So I made some. You should too.

Caramels_IngredientsHoney.jpg

Candy making is not very difficult since it’s mostly playing with sugar temperatures to manipulate the granules into a different texture. The problems lies not in its complexity but the fact that sugar burns and it also takes a while to heat up, increasing the chance that you will lose interest and walk away only to return to find sugar burned to the bottom of a pan. But home candy making is not something you should be intimidated about. It does require some special equipment (a candy thermometer) but it’s a relatively easy task once you have that. Plus, the cost of messing up a batch is pretty small – just a few cups of sugar are wasted since it’s generally in the sugar cooking stage that things tend to go wrong. The real key here is: don’t walk away from the stove. Just don’t. It might be boring to stand and watch the sugar darken but if you walk away it will burn. Make a game of it, dance around, practice counting in foreign languages, whatever you have to do; but don’t walk away.

Caramels_PanCooling.jpg

The 1000 pound gorilla in the room when it comes to home candy making is corn syrup. Yes, corn syrup is in most recipes for home candy making. The problem is that while sugar can be melted into a liquid to form a chewy delicious treat, it really wants to stay in granule form. So if the pan is moved too much when you make the candy, the sugar has a tendency to recrystallize, thus ruining all your hard work. Using corn syrup, or any liquid sweetener high in glucose, helps prevent that recrystallization since glucose doesn’t crystalize. But with all the concerns about high fructose corn syrup (which is not the same as home use corn syrup), and the fact that most plain corn syrup is made with GMO corn, it can be a sticky subject. I’m not saying I don’t cook with corn syrup – in some cases it’s really the only option for high glucose liquid sweetener – but when I can find a way to avoid it, I will.

Caramels_Scattered-2.jpg

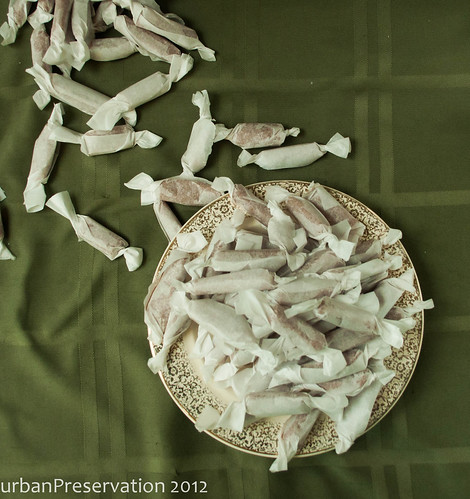
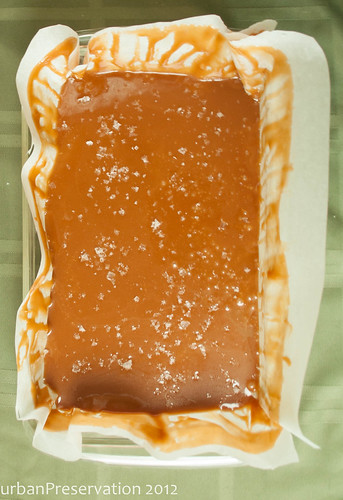
In the case of these caramels, honey plays the role of high-glucose liquid sweetener to prevent your chewy sweets from becoming full of hard sugar crystals. The end result is definitely honey flavored which is a nice added dimension to these sweets. It’s also a great beginner caramel recipe since the honey adds some color to the caramel so you don’t need to cook the sugar as much to get a deep golden color. I’ve been enjoying these for two weeks now and they’re still just as chewy and delicious as the first day.
Worried about cleaning that pan? Don’t be – place all your sugar-coated implements (no judgment; just getting clean) into the caramel pan and put it all in the sink. Boil a kettle of water and pour the just-boiled water into the pan, making sure to get all the little splashes of caramel. Let it sit for a few minutes, then give everything a gentle scrub. Clean pan, delicious candy, no sweat.

Caramels_UnwrappedSoftFocus.jpg

Honey Salted Caramels
Adapted from Chez Pim

1 ½ cups sugar
½ cup honey
1 cup heavy cream
½ stick (4 oz) butter, softened to room temperature, cut into half-inch cubes
1 tsp kosher salt plus additional for sprinkling.

Pour cream into a small saucepan and put on very low heat to simmer.*

Place honey and sugar in a pot over medium heat. Cook until caramelized to the color you want in your caramels. Shake or swirl the pot to get sugar crystals to melt but don’t stir – that encourages recrystallization.
When the sugar reaches your desired color, whisk in butter a few pieces at a time. Once all the butter is incorporated, whisk in the cream and add salt.** Attach your candy thermometer to the pan and cook the mixture until it reaches 260F.

Pour the hot caramel onto a baking sheet lined with parchment paper. Cool for 8-10 minutes, then sprinkle evenly with salt; I used Maldon sea salt. Let caramels cool completely, 3-6 hours, before cutting. Cut into bite-sized pieces with scissors or a well-greased knife. Wrap individual caramels in parchment or waxed paper.

*Adding cold cream to the caramels will cause the caramel to seize and the cream to curdle.
**When the cream is added the mixture will bubble up a bit. Be prepared.

Monday, January 30, 2012

Winter Panzanella

Remember a few weeks ago I mentioned buying a bunch of beets and having a few leftover? (No? Well I’ll wait right here while you catch up.) I bought them primarily to make a winter version of panzanella, another in my list of fancy sounding dishes that do not actually take much work to put together. Panzanella is generally a summer dish but the real genius of it is that it uses stale bread to form the bulk of the salad.

Panzanella_BreadwParsley.jpg

San Francisco is a town that takes its bread seriously and there are lots of good inexpensive bread to be had pretty much everywhere you go. As a result, we often have half a loaf of something laying around that should have been eaten on the day we bought it, which was generally at least three days ago. I’ll admit I’m not above eating slightly stale bread but there comes a point when the loaf cracks when you cut it and at that point, even I can’t bring myself to eat a slice. Yes, this is perfect for making breadcrumbs, but there are only so many breadcrumbs you can have before you have to look for other ways to use stale bread.

Supreme_SegmentsRemoved.jpg

Panzanella combines leftover stale bread with salad ingredients which softens the bread and makes it partly chewy and partly crunchy. But in winter, I won’t be caught dead putting sad mealy tomatoes in my salad so I had to come up with a variety of winter ingredients to substitute for the traditional flavors and textures. Traditionally, panzanella has tomatoes, cucumber and/or bell pepper, red onion, and basil along with vinaigrette and maybe some parmesan. So that’s something sweet and juicy, something crunchy and juicy, something sharp, an herb to tie it together, and an optional cheese.

Panzanella_Composed-6.jpg

Beets are everywhere in the winter and I love their juicy yet firm texture. Red beets would be too sweet in this situation but the golden and candystriped beets I used aren’t as sweet and as a bonus, they aren’t as likely to dye all the other ingredients bright pink. For the juicy and sweet element, citrus fruits were the obvious choice since the varieties are endless, especially in winter. I used a grapefruit, two cara cara oranges (which are pink inside!) and a mandarin for this recipe, supremed of course, but any kind of citrus will do. The herbal element became parsley, the red onions stayed, and the cheese was played by a few ounces of feta.

Panzanella_Composed-5.jpg

Mix the salad together about 15 minutes before you plan to eat it, to allow the bread time to soften, but I find this is one of those things that really does not hold up in the fridge overnight. If I have more that I know will be eaten in one meal, I might save the extra salad ingredients separate from the bread cubes so the next day’s batch won’t have gone from chewy to soggy. The best part about this salad is since it’s more substantial (and less virtuous feeling) that the typical lettuce variety, it can just as easily be served as a meal on its own; nothing else needed.

Winter Panzanella

4 cups of stale bread, cubed
4-5 medium sized beets, roasted, halved, and cut into slices
1 small red onion, thinly sliced
4 citrus fruits, supremed - orange, grapefruit, lemon, etc
1/2 cup finely chopped parsley
3-4 ounces crumbled feta (about 1/3 cup)
Juice of 1 lemon
1/4 cup olive oil
1 tsp mustard
2 tsp plus 1/2 tsp kosher salt

Arrange the bread cubes on a tray so that no pieces are touching and leave overnight to dry out.*

combine sliced beets, red onion, citrus segments, parsley, 2 tsp salt, and feta in a large bowl.

In a small container with a lid combine lemon juice, olive oil, mustard, and 1/2 tsp salt. Shake well for 1 minute until well combined.

15 minutes before serving, add bread cubes to the beet and citrus mixture. Pour over vinaigrette and stir to combine. Let sit for 15-30 minutes for bread to absorb juices. Serve cold or room temperature.

*If your bread is stale all the way through the loaf, you can skip this step.

Friday, January 27, 2012

How to - Supremeing Citrus

Mandarin orange slices are one of the things I remember distinctly as a food I ate as a kid and which I have almost zero interest in buying now. I don’t think my mom bought them often, but every once in a while they would show up in the pantry in their little individual cups swimming in syrup or water or whatever that liquid was. They didn’t taste particularly like oranges, more like a non-descript sweetness. But I loved them for their texture not their taste. No chewy skin, no seeds, no bitter pith. Like most mediocre foods that are acceptable to feed to children but not adults, mandarin orange slices didn’t really occupy my thoughts for many years until I watched someone on some food show “supremeing” an orange and I realized this was a way to mimic the texture of those slices while still eating something that tasted like citrus

When learning new techniques in the kitchen, I always like to weigh the complexity of the task against the difficulty the name suggests. The more impressive the name and the easier the task, the more likely I am to accomplish it. Supreme (rhymes with “pants hem”) is a fancy word for an incredibly useful technique that is not actually particularly complicated but makes people ooh and ahh when you talk about it. The end result is clean citrus slices without any bitter skin or seeds that can be easily added to salads, fruit tarts, jams, and sauces. The remaining segment-less piece of citrus can also be juiced for some additional flavor. I like to add finely chopped supremed lemon to quinoa to perk up the flavor. Or just add them to my morning yogurt. This fancy technique needs no special occasion.


You’ll need
At least 1 piece of citrus - orange, lime, lemon, grapefruit, all have excellent uses
A relatively sharp knife
Hands free of cuts and hangnails or the juice will sting – Alternatively wear non-latex gloves. I keep them around for working with chiles as well.

Step 1. Cut off the top and bottom – stem and blossom ends - of the citrus you’re working with so that it will sit flat on a cutting board.

Supreme_HalfDone.jpg

Step 2. Starting from the top and working around the natural curve of the fruit, slice away strips of the peel and pith so that the flesh of the fruit is exposed. You may cut away a large amount of fruit in the beginning but better waste some fruit than leave pith on the finished product.I find that it’s often helpful to turn the fruit upside down after cutting away all the peel, to make sure all the pith is removed as well - unlike in the picture below. The curve of the orange can hide spots.

Supreme_PeeledButWithPith.jpg

Step 3. Holding the citrus in your hand, identify the segments of the citrus, separated by a thin white line created by the skin separating the segments.

Supreme_PeelRemoved.jpg

Step 4.Insert your knife about 1/8 inch from the line of pith and gently slice towards the center. Do the same on the other side of the segment, 1/8 inch away from the pith. At this point the segment should gently slide out from the fruit. If it doesn’t repeat your cuts going slightly deeper in the center of the fruit and angling the cuts towards one another until they meet in the middle, freeing the segment.
Supreme_SegmentsRemovedOverhead.jpg

Step 5.Continue to remove segments by slicing them on both sides and removing while leaving the skin between segments intact. The final product will be juicy segments of citrus and a pinwheel shaped remainder of the original fruit.

Supreme_SegmentsOnly.jpg

The empty remains of the fruit can be squeeze for additional juice that is often a good addition to whatever dish you're making with the segments. Or it can be saved for sweet addition to a vinaigrette. Or put straight into a glass and enjoyed.

Thursday, January 26, 2012

Romesco Sauce

One of the first things people say when coming to my house for the first time is, “wow, you have a lot of cookbooks.” Which is absolutely true. My apartment has two bookcases and three shelves are dedicated to cookbooks. Maybe four of them belong to my roommate. Jeff and I get a lot of cookbooks as presents and we also buy a lot of them at thrift sales and used book stores. But on any given day when I’m looking around for what to make for dinner, I rarely crack open a cookbook and if I do it’s even more rare that I follow the recipe.

Romesco_Ingredients.jpg

Don’t let this confession make you think that my cookbooks sit on the shelf gathering dust. I use them all the time just perhaps not for what most people do. I use about 5% of my cookbooks and the rest I just fish out the sauce-type recipes and make those over and over. By the time I get around to making a meal, I’m often too tired to go out and get any missing ingredients or learn a complicated new method. But by taking the sauce recipes and adding them to my already-tried techniques I could get a whole new dish with fewer complications. And I could arguably claim to be using my cookbooks and thus justify their ever growing number. Perfect.

Romesco_FriedBreadOverhead.jpg

This is how I fell in love with Romesco sauce, a recipe that came from one of my fanciest cookbooks and which is incredibly easy to make. It uses a lot of odds and ends – a few almonds and hazelnuts, the ends of a loaf of bread toasted golden, and that annoyingly small amount of canned tomatoes left from another experiment. And the end result is much, much more than the sum of its parts. It has a dark and earthy flavor from all the dried chilis and because it is doesn’t require emulsification it can be easily thinned out to create a marinade without creating an oily mess.

Romesco_Blended.jpg

The recipe is pretty high in ingredients but don’t let that keep you from making it, especially since it’s mostly a toast-blend-and-serve kind of thing. It’s endlessly versatile – the original recipe it came from called for the sauce to be served on potatoes (an excellent choice) but I also spread it on bread, add it to hummus or yogurt sauce, use it to marinate meat or fish, scramble it into eggs, and drizzle it on roasted vegetables. A jar of it will keep in the fridge for up to three weeks but why wait that long? I find a well made sauce can perk up just about any meal and turn it from weeknight-standby to new-and-delicious, in about 3 tablespoons.

Romesco_RomescoPotatoes.jpg

Romesco Sauce
Lightly adapted from Sunday Suppers at Lucques by Suzanne Goin

Makes 1-2 cups of sauce, depending on thickness.

5 dried ancho chiles – you can substitute New Mexico, pasilla, California/Anaheim, or guajillo chiles
2 tbs raw almonds
2 tbs raw hazelnuts
4 tbs plus 1 cup olive oil
1 slice white bread – any will do – about 1 inch thick
1/3 cup canned tomatoes
1 clove garlic, chopped
1 tbs chopped flat-leaf or Italian parsley
Juice of half a lemon
Salt to taste, about 2 tsp

Preheat oven or toaster oven to 375F. Spread nuts on a baking sheet and toast for 8-10 minutes until they are golden brown and aromatic.*

Remove and discard the stems and seeds of the chiles. Soak them in warm water for about 15 minutes to soften. Strain and pat dry.

Heat a large sauce pan on high heat with 2 tbs of olive oil. Fry the slice of bread on both sides until a deep golden brown. Remove and cut into one inch cubes.

Keep the pan on high heat and add 2 more tbs of olive oil to the pan and add the chiles and sauté until they blister slightly, about 5 minutes. Add the tomatoes and season with ½ tsp of salt. Cook until tomato juices have mostly evaporated. Turn off heat and let cool slightly.

In a food processor, blender, or with an immersion blender, pulse the toasted nuts, garlic, and bread until coarsely ground. Add the chile/tomato mixture, parsley, and lemon juice and process until smooth and well distributed.

With the motor running add olive oil, up to one cup until the sauce reaches your desired texture.** The sauce may separate into oils and solids – that is normal and it will mix back together with about a minute of blending. Taste to adjust seasoning. Refrigerate for up to three weeks.


*You can skip this step entirely and use roasted nuts instead. I like the extra toasty flavor but it doesn’t make a big difference.
** I prefer to add only ¼ cup of oil and keep it more like a paste because I find it’s easier to use that way. If I need it to be thinner for a marinade, I thin out only the amount I’m using.

Wednesday, January 25, 2012

Butternut Squash Soup

The weather here has been cold and gray and partly rainy since last week and that means all I want to do is eat soup. To my mind, there are two kinds of soup. There’s the kind that is chock full of things – potatoes, carrots, noodles, meat, maybe some barley or rice. Soup so full of bits and pieces that you could almost skip the broth entirely. Then there’s soup that is only liquid, made of only a few ingredients but so intensely flavored by those few that you scrape the bowl to get every last drop.

ButternutSoup_HalvedwShadow.jpg

I love ordering this second kind of soup in restaurants – it’s so rich and smooth, obviously full of butter and requiring annoying amounts of time. At home I stuck to the soups with lots of pieces of vegetable, meat, and grains, until recently when I discovered a surprising trick to homemade soup. In The French Laundry Cookbook, of which I own a well loved (read: stained) copy, there’s a small ode to soups and how they’re made. For a man known for extremely complex dishes with many, many steps, Thomas Keller’s approach to soup is fascinatingly simple: “Identify your ingredient, cook it perfectly, and adjust the consistency.” Perhaps the “perfectly” is not so simple to achieve but the idea of good soup coming from careful preparation of one or two ingredients caught my eye and I started experimenting with this principle.

ButternutSoup_Sliced.jpg

The recipe below is for butternut squash soup but it can easily be adapted for just about any vegetable whose flavor improves with roasting (cauliflower, parsnips, broccoli, carrots). The overall method remains pretty much the same – cook the vegetable to the desired taste, puree it, and thin it with water or stock. While the French Laundry method requires straining the resulting puree several times through progressively smaller straining devices, I’m not looking for perfection in my kitchen, just comfort and deliciousness. If I’m feeling industrious I might pass the vegetables through a food mill or my fancy chinois. But normally I just blend them for a few minutes on high using my immersion blender and call it a day. You can add cream for the additional flavor and body but it mutes the flavor of the vegetables, as will butter. I like to keep things simple by adding just a drizzle of oil to my bowl at the table.

ButternutSoup_OiledonPan.jpg

For added flavor during cooking my favorite low-cost flavor addition to homemade soup is Parmesan rinds. I save the ends of all my Parmesan wedges after I’ve grated them to the bone and then throw one or two into soups. It adds an extra flavor without the unpleasant graininess that can happen when you put cheese in soup and let it simmer for a while. However, the soup can easily be made vegan by omitting the rinds and still tastes excellent on its own. As a low maintenance recipe with high quality output this soup is something I can really get behind when the weather turns gray. A hot bowl served with some thick bread or a crisp salad is really all it takes at the end of gray day to make things look sunnier. Maybe some slippers too.

ButternutSoup_FinishedBowl.jpg

Butternut squash soup
Method adapted from the French Laundry Cookbook

Makes 3-4 servings, depending on your preferred texture.

1 large butternut squash, about 3-4 pounds
2-3 tbs olive oil
1 tbs kosher salt
2-4 cups stock or water, more if needed
2 parmesan rinds
Salt and pepper to taste
Good quality oil for serving

Preheat oven to 425F. Peel and chop squash into approximately 1 inch chunks. Line a baking sheet with foil and oil it lightly with about 1 tbs of olive oil to prevent sticking. Arrange squash on the pan, making sure each piece is resting on the sheet, not on it’s neighbor. Drizzle with remaining oil and sprinkle with 1 tbs salt. Roast for 1hour, tossing the squash halfway through to ensure that it cooks evenly and doesn’t burn on the side touching the pan.

While the squash is still warm, puree using a food processor, food mill, blender, or immersion blender. For a smoother texture, pass the resulting puree through a fine-mesh strainer or chinois. Place the vegetable puree in a large pot and add liquid until it reaches desired consistency. Place the pot on low heat, add parmesan rinds, and simmer for at least 30 minutes. If left longer, cover the soup to prevent excess loss of moisture. Taste after 30 minutes and season with salt and pepper until it reaches the desired flavor. Discard rinds before serving. Serve with a drizzle of good quality oil and some chewy bread or a salad for an easy rainy day meal.

Tuesday, January 24, 2012

Chess Pie

DSC_0212.jpg

I have a tendency to make unusual word associations, often involving food. Certain words remind me of food and then I have this strange imagery inserted into whatever conversation I’m having. For example, the word “extraordinary” always makes me think of “strawberry.” I’ve found that in conversation, “extraordinary” is often said right before the word “achievement” and then I have this image of a strawberry with a gold star while everyone else is talking about meeting fundraising goals in record time or something of that nature. Strange? Perhaps. Worrying? Never.

DSC_0197.jpg

A few weeks ago I was playing an ultimate frisbee tournament with a team named “Occupy Sesame Street.” And as tradition goes, right before we took the field each game we would form a huddle and cheer and generally our cheer would be “Occupy.” The team played a total of 6 games over two days and somewhere around game 3 I started to hear “Occu-PIE.” Every time we broke from our huddle all I could think was, “Mmm, pie.” At one point I even asked the team if they heard it too – everyone kind of looked at me like I had grown a new head and then we all laughed it off and I didn’t mention it again. But all weekend I kept thinking of pie and how I could get some.

DSC_0204.jpg

Here’s the problem: I will not buy a slice of pie with mediocre crust. I just can’t do it. So if I want pie I am often forced to make it for myself. I know. My life is just so hard. But I must say, you do an excellent job playing such a small violin.

DSC_0208.jpg

I lasted approximately three hours after getting home from the tournament, if you don’t include the time I spent sleeping, before I made myself a pie. I woke up, opened the fridge to find some breakfast, saw a half container of leftover buttermilk, and immediately started thinking about chess pie. Chess pie, for the Yankees among you who have never experienced this Southern delight, is a custard pie flavored with lemon or vinegar. It’s pretty typical in the South but not so common above the Mason-Dixon line and I think it’s time to expose that delicious secret. This is a one bowl pie, not including the crust , and it takes about ten minutes to throw the filling together if you spend five of them looking for the ingredients in the fridge. And the result is delicious – silky delicate custard with just enough sweetness countered by the tang of buttermilk and lemon. This pie is also best served the day it’s baked so invite over a few friends and share it around. Or don’t. I won’t tell.

DSC_0223.jpg

Chess Pie
From the Pie and Pastry Bible by Rose Levy Beranbaum

1 recipe flaky piecrust
1 egg white

3 eggs
1 ½ tsp cornstarch
1 cup sugar
1 ½ cups buttermilk
1 stick (8 tbs) butter, melted and cooled
2 tsp lemon zest
Juice of half a lemon (approximately 1-2 tbs)
½ tsp nutmeg
1 tsp salt

Preheat oven to 425F for at least 20 minutes so that it is uniformly hot. Roll out pie dough and arrange it in the pie pan. Place a piece of parchment or oiled tinfoil on the unbaked shell and fill with pie beans or pie weights.* Bake for 20 minutes. Then remove the beans or weights and lightly prick the crust with a fork, making sure the tines only go halfway through the dough so the filling won’t leak. Continue baking crust for 5-10 minutes until it pale golden brown. Check it halfway through and prick it again if the dough begins to bubble up. Remove the prebaked crust from the oven and when it has cooled slightly but is still warm, brush it with egg white.** Let crust cool to room temperature.

Preheat oven to 325F and place an oven rack on the lowest level of the oven. Put a foil lined baking sheet on the rack to preheat with the oven.

In a large bowl, combine egg, cornstarch, and sugar and whisk until well mixed. Beat in buttermilk, alternating with the melted butter, in several parts. Beat in the lemon zest and juice, nutmeg, and salt. Pour the filling into the dough and bake for one hour or until surface is lightly browned and filling is set. The filling will jiggle slightly when moved but will not stick to your finger when lightly pressed. A knife inserted between the crust and filling should come out clean. Serve at room temperature

*I use a half pound of black beans that I keep in a bag clearly marked “pie beans” so that I don’t accidentally try to cook them.
** Egg white will create a shield so that the wet filling won’t make the bottom crust soggy.

Monday, January 23, 2012

Chimichurri Couscous

Parsley gets a bit of a bad rap. It’s so often the unfortunate garnish or the superfluous ingredient that people seem to dismiss it as a serious ingredient. For years when a recipe called for parsley I would like as not skip it. I saw no real point in using parsley, other than for color. Also at fault are some horrible memories I have of eating (or at least attempting to eat) curly parsley while feeling like my mouth was full of plastic toothpick frills.

10986560.jpg

Then I fell in love with chimichurri sauce. I loved the tang and the heat, but mostly I loved the clean, grassy, herbal flavor of the parsley that makes up the majority of the sauce. There are of course about as many variations of chimichurri as there are people who make it, but most recipes agree that parsley plays a key role, if not the sole herbal element. So when my roommate bought an extra bunch of parsley and asked if I wanted to use it, I had a good idea where it was going to end up.

DSC_0078.jpg

Chimichurri as a sauce on already cooked foods is great but as a dressing for an Israeli couscous salad it leaves sometimes to be desired. The chile flakes that distribute heat so well through the oil and vinegar provide an uneven heat when mixed into a salad. Some bites have too much heat, some none at all. The raw garlic that’s traditional in chimichurri also doesn’t play nice in a room temperature salad. Without something rich and fatty to cut through, the sharpness of the garlic tends to overwhelm just about everything, including my breath for the next day or so. Those flavors are still really important to the finished product so I gave them both a bit of a pick me up to help them meld better in the final dish.

DSC_0072.jpg

To tackle the chile flakes I infused them into some neutral oil to mix into the final dish. Infused oil is a great way to evenly distribute a dried herb throughout a salad. Add the herbs to cold oil and put it over medium heat for a few minutes until the oil takes on the scent of the herb. Then strain it and bottle it for future use. The chile oil added a nice even heat to the couscous and it doesn’t hurt that the dried chile flakes dye the oil a brilliant orange. To mellow the garlic I used roasted cloves instead of fresh which added the garlic flavor without the sharp sting. Even if you’re not making this dish, roasted garlic is a great thing to have around to add to recipes or just to spread on good bread with some quality olive oil. Additionally, the soft garlic can be a great addition to salad dressing since it will dissolve into the vinegar with a little whisking.

DSC_0086.jpg

The final dish has a good amount of heat and some sweet nuttiness from the roasted garlic, but it’s the parsley that really steals the show. Green and herbal, it’s a great example of how an overlooked ingredient can make a huge difference in a dish.

Note: I made this with Israeli couscous because it’s what I had around the house. Would it be equally delicious with other grains, including regular couscous, barley, farro, quinoa, and pasta? You bet.

Chimichurri Couscous

1 cup uncooked Israeli couscous
2 cups water or chicken stock
1 tbs salt + additional for seasoning

1/3 cup neutral oil, such as canola or safflower
1 tbs red chile flakes
¼ cup red wine vinegar
4-6 cloves roasted garlic (recipe below)
1 large bunch flat leaf or Italian parsley, finely minced

Bring the water or stock to a boil in a medium pot and add the Israeli couscous and the salt. Stir in the couscous and cook for 6-8 minutes or until couscous is tender all the way through. Drain and set aside.

Place the oil in a small pot and add the chile flakes to the cold oil. Place it over medium low heat and cook for 5 minutes or until oil takes on the scent of the chile flakes and turns a bright orange color. The longer it cooks the spicier the oil but avoid burning the chile flakes which will make the oil bitter. When oil reaches the desired spice level, take it off the heat and strain out the chile flakes.

Mash garlic cloves into vinegar and whisk until garlic is fully incorporated. Mix vinegar/garlic mixture with oil to create a loose vinaigrette. Combine vinaigrette, couscous, and parsley and stir to distribute evenly. Taste to adjust seasoning. Serve warm or at room temperature.

DSC_0001.jpg

Easy Roasted Garlic

1 head raw garlic
2 tbs olive oil

Preheat your oven to 400F. Place the garlic in a small baking dish and add water to come a quarter inch up the side of the dish.* Pour the olive oil over the garlic head and cover with foil. Roast for 1 hour or until garlic cloves are soft to the touch. Let cool and peel cloves. Store peeled cloves in a well sealed container in the fridge. Avoid plastic if possible because it can hold the smell of garlic even after washing.

*Roasting the garlic in a small amount of water prevent the bottom of the garlic from burning and adding a bitter flavor to the roasted cloves.

Friday, January 20, 2012

How To - Flaky Piecrust

Ahh, pie crust. Pie dough is one of those things that is pretty good from a package. But well done homemade pie dough can take a pie from “this is good pie” to “this pie is amazing.” I make a pretty mean pie crust. And there’s no reason you shouldn’t too. Don’t know how? Well this is your lucky day.

“This pie crust is so good that it makes anyone who uses store bought pie crust look like someone who doesn’t know how to make pie crust.” – Michael Tyler Frederickson.

Nicely said! Added bonus, when you make this pie dough you know exactly what goes into it. And it doesn’t include Yellow 5 or Red 40 or preservatives. Unless you’re into that thing. In which case this recipe will not help. But for the rest of us, let’s begin.

You’ll need:
1 stick (8 tbs) cold butter
1 cup flour, sift before measuring – this part is really important for consistent results! It minimizes differences in the amount measured due to how tightly the flour is packed.
1 tsp kosher salt
1 tbs apple cider vinegar - makes the crust more tender and relaxes the gluten formed while mixing.
Up to 1/3 cup of water, added 2 tbs at a time.

Step 1: Place the flour and salt in a mixing bowl and add the butter, cut in slices. Mix the flour/salt and butter together using just your fingers. Don’t use your whole hand to do the mixing since your palms are usually pretty warm and you want to keep the butter as cold as possible. Mix until most of the flour has at least some butter on it but there are still some large chunks of butter hanging around. Those big pieces are essential to lovely flaky layers so err on the side of undermixing.

PieCrust_JustMixed

Step 2: Add the vinegar and then add water a few tablespoons at a time until the flour comes together into a dough. It should all stick together but it shouldn’t stick to the bowl or to your hands when you press it.

PieCrust_FormsADough

Step 3: Place the dough on a piece of plastic wrap and flatten it with your hands into a disc about 6 inches across. This can also be a last minute check for stickiness. If the dough sticks to your fingers when you press it out, sprinkle it with a little extra four, then wrap it up. Let the dough rest for at least 30 minutes. You can even make the dough a few days ahead and leave it in the fridge or freeze it for up to a month before using.

PieCrust_FlattenToDisk

Step 4: Roll it out so that it’s about an inch or two bigger than your pie pan on all sides. This part will be important for sealing the top crust or making a pretty crimped edge. And those lovely big pieces of butter in the dough? Those are going to make some nice flaky pastry!

PieCrust_RolledOut

Step 5: The best way I’ve found to transfer dough is sprinkle extra flour on top, fold it into quarters, then place it so the tip of the triangle is in the center of the pie pan and unfold. Works like a charm.

PieCrust_InPan

Bonus step: Crimp the edges by folding that extra inch of dough under so you now have a double layer of dough on the rim of the pie pan with the edge hidden under the dough. If some areas of the dough are longer, rip that piece off and use it to patch a shorter piece. To get that traditional crimp place your index finger and middle finger on the outer edge of the dough about a half inch apart and your thumb on the inner edge of the dough between them. Pinch lightly. Now move your index finger to the indent made by your middle finger and repeat. End result, a beautifully crimped edge.

PieCrust_HalfCrimped

Use with your favorite pie recipe. Also with your second favorites. Try this one. Wow your friends. Tell them, “It was easy.” Right?

Thursday, January 19, 2012

Madeleines

My kitchen is not particularly large. This is perhaps not a unique problem for someone who rents an apartment in a city, especially if that city is San Francisco. But it has had a serious impact on my kitchen purchases over the last few years. Alarming quickly our cabinet filled with dishes, pantry goods, odd Tupperware lids, pots and pans, as well as my relatively small collection of bake ware. So when it comes time to buy a new piece, I always have to consider – how much do I want this and what else can I use it for?

Madeleines_MakingOf

This has led to several dilemmas where I want something that has only one purpose. Like a special pan to make Madeleine cookies. Light and chewy – they are really everything good about cake but in a cookie size with a beautiful shape. But I just couldn’t justify the space for something that only makes one thing.

Madeleines_SunLemonPowder

I apparently talked about my love of Madeleines a lot because a few years ago some great friends bought me one for my birthday. And well, you can’t just throw away such a thoughtful present, right? I didn’t think so. So I decided that to make up for the fact that it had only one use, I would just make a lot of Madeleine cookies with it.

Madeleines_FinishedwPerspective

I can’t say that I’ve kept up that part of the bargain as well as I should. With all the other interesting dessert recipes to try (like a delicious pie I’ll be sharing soon!) there just aren’t as many Madeleines in my life as I’d like. That’s not to say I don’t make them a lot. I make Madeleines probably more than any other cookie so at this point I’ve learned the finer points of how to make these delicious “tumor cookies,” as a friend once called them.

Madeleines_FinishedSunlight

The lemon is my favorite thing about Madeleines so I don’t fuss around with other flavors. There’s zest mixed into the dough and I also like some extra lemon flavor just before baking. I take toasted lemon powder (strips of lemon peel, pith removed, left to dry for a few days, toasted lightly for a few minutes, then ground in a spice grinder) and sprinkle it on the tops before baking. It increases the lemon flavor and aroma without the tartness that lemon juice would add. Normally I like a little tart and sweet but it just doesn’t work here – use extra lemon zest if you don’t want to be bothered making lemon powder. And if you don’t have the Madeleine pan, you can use a muffin tin instead and divide the batter evenly among the 12 cups. They won’t have the nice seashell shape but you’ll still get that sweet bump in the middle.

Madeleines_Finished

Madeleines
Adapted from Baking: From My Home to Yours by Dorie Greenspan

Makes 12

2/3 cup flour
¾ tsp baking powder
1 tsp kosher salt
½ cup sugar
Zest of 1 lemon or 2 tsp of toasted lemon powder
2 eggs
2 tsp vanilla
6 tbs butter, melted and cooled

Combine flour, baking powder, and salt in a small bowl. Put sugar and zest in a large mixing bowl and stir with your fingers until the sugar is fragrant. Working with a whisk, hand mixer, or stand mixer, beat in eggs until light and foamy. Whisk in vanilla, then flour mix, and then butter. Cover with plastic wrap and refrigerate for at least 3 hours, 6 or 8 is ideal.

Preheat over to 400F. Butter your Madeleine pan/muffin tray well to ensure that cookies release after baking. Spoon the batter into the molds, making sure it’s evenly divided. Once all the batter is in, give the pan a little shake to ensure that the batter is evenly distributed in each mold. Bake for 10 minutes or until the top are puffed up and the edges of the cookies are a dark golden brown. Immediately remove cookies by turning the pan upside down and then place them on a cooling rack; use a knife to pry out any stragglers – removing them quickly ensures a crisp edge. Eat warm or at room temperature, depending on how you like your cake.

Wednesday, January 18, 2012

A Call For Internet Freedom

No post today. Instead, check this out. Let Congress know that internet censorship is not the way to deal with piracy.

Tuesday, January 17, 2012

Pickled Carrots

Every week I get a box of vegetables from my CSA (Community Supported Agriculture). We don’t pick what will come in the box but usually it’s a good mix of staples (like onions, garlic, and citrus), seasonal items, and the occasional bag of walnuts or pistachios. I love the challenge of getting the box each week and trying to figure out what to make with it before the next box comes. But depending on the season there are some things you get week after week after week until you are at your wits end about what to make with them.

PickledCarrots_raw.jpg

Right now, we are deep into carrot season. Carrots pose a bit of a challenge – they aren’t my favorite snack and my boyfriend, Jeffrey, doesn’t like to eat them cooked. I’ve spent weeks dipping them in hummus (link), shredding them into some form of raw carrot salad, or adding them to stir-fry. And when I get really sick of a vegetable, I find the quickest way to increase my appreciation for it is to pickle it.

PickledCarrots_weighing.jpg

Perhaps this instinct comes from my uncommonly robust love of vinegar. When possible, I douse my French fries in vinegar; I put spoons of it in curries and stews to brighten the flavor; I make salad dressing that is closer to 1:1 oil to vinegar than the traditional 2:1. I may or not be known to enjoy plain pickle juice on occasion. So when my latest batch of carrots was short enough to fit in a jar, I knew what I would be doing with them.

I do can pickled vegetables but this recipe is not meant to be processed and saved on the shelf – these are definitely refrigerator pickles. I like to save the effort of canning for things that won’t be around in later seasons and carrots seem to be ever-present. Additionally, when I do water-bath can things, I always use a tested recipe to ensure that the level of acid is high enough to stop any bad bacterial growth. This one I just made based on what vinegars and spices I had available that would pair well with carrots.

PickledCarrots_preBrineJar.jpg

These pickles take a few days to ferment but when the waiting is through, they are delicious! I eat them plain out of the jar but they would be great shredded on a sandwich or chopped into a salad for some extra bite. Since the recipe isn’t meant to be canned, feel free to play around the flavorings and types of vinegar. I think next time I might include some dried chili peppers to heat things up or maybe use a small amount of balsamic vinegar to sweeten the end result. Any way you flavor it, they provide a delightful pick-me-up for your taste buds.

PickledCarrots_filledJarGarlic.jpg

Pickled Carrots

Makes 1 pint jar

¾ pound carrots, cut to fit in your pint jar with one inch of headspace. Also make sure that they are cut to approximately equal widths so they blanch and pickle evenly.

1 cup apple cider vinegar
½ cup white distilled vinegar*

2 cloves garlic
1 tsp caraway seed
1 tsp fennel seed
½ tsp whole black peppercorns
1 tsp yellow mustard seed
2 tbs plus 1 ½ tbs kosher salt

* Distilled vinegar can be a bit sharp so if you like a milder pickle substitute an equal amount of apple cider or rice vinegar here.

Fill a pot with about 4 cups of water and bring to a boil. Add 2 tbs of salt and reduce to a simmer. Blanch the carrots in two to three batches by placing them in the simmering water for about 30 seconds. Make sure that you don’t add so many carrots at a time that the temperature drops below a simmer.

Arrange the carrots in your pint jar. This may be a tight fit depending on how many you have – I find it easiest to place the jar on its side while filling it; it provides more space.

Empty the pot of water and place the vinegars, garlic, spices, and remaining 1 ½ tbs of kosher salt. Heat until it just boils, remove from heat and pour in the carrot-filled jar, leaving a ½ inch of headspace in the jar. You will probably have some leftover brine and garlic or spices in the pot. Using a spoon, transfer the remaining garlic and/or spices from the pot to the jar. Screw on the cap and let cool to room temperature then refrigerate. Keep them in the fridge for at least three days before eating to let them fully pickle – the longer you let them sit in the brine, the more pickle-y the carrot.

Monday, January 16, 2012

Quinoa and Roasted Beet Salad

Beets were not something I really ate as a kid. My parents suffered through canned beets and boiled beets and they saw no point in making my brother and I suffer too. I grew up thinking of them similarly to lima beans – one of those gross vegetables that mean parents make their kids eat but which have no redeeming quality. It’s entirely possible I did not eat a beet until I was 20.

Quinoa_salad_roasted_beet.jpg

Then, in college, I studied abroad in Australia for a semester. Aussies have a weird habit of putting a slice of canned or roasted beet on their burgers instead of tomato. In fact, the first time I had a (veggie) burger in Australia, I remarked that the tomato was unusually sweet and not mealy, especially since the place I was in was a kind of dive-y bar, before being informed that it was in fact a slice of beet. This is actually a pretty genius substitution since the beet provides the sweetness and juiciness that the tomato is supposed to but which is often fails to provide. That was the first time I realized that beets could in fact be delicious and I have since convinced many people to embrace them, including my somewhat-skeptical parents.

The trick to beets, as with many vegetables, is to roast them. The roasting really deepens the sweetness of the beets and it avoids the unpleasant off flavors that can come out when you boil them. I prefer the golden and candy-striped (or chiogga) beets because they are less sweet than the red ones you typically find in stores. They can be hard to find but they’re definitely worth it.

Quinoa_salad_sliced_beets.jpg

Once you’ve roasted them, there are a lot of things you can do with beets. I bought a bunch with a particular recipe in mind (ed: it was this one) but I bought more than I needed so I had to figure out what to do with a few extra. I’ve been trying to challenge myself to come up with more interesting grain salad recipes and this seemed like an excellent opportunity. What came out of it was not so much a recipe as a method – good grain salads need chew, body, and some crunch and the combination of tangy-salty-sweet-herbal is always a good way to keep your palate interested. Spicy works too but that will have to wait for a different version of this salad.

Quinoa_salad_composed_salad.jpg

I knew quinoa would add a nice chewiness and grassy flavor and the beets would add a bit of heft and sweetness. What I needed now was something salty, something tangy, and something a little herbal. I used feta for the salt (although goat cheese works too, as evidenced by the ubiquitous beet-and-goat-cheese salad on Northern California menus). The tangy came from a lemon vinaigrette and some pomegranate seeds, which also added a little crunch. And I chose mint for the herb since it pairs really well with beets. I served this with hummus and pita bread to create a balanced meal but it’s easy to switch up this recipe, serve it with another kind of protein, and call it dinner. I know I will.

Quinoa Salad with Roasted Beets, Feta, Pomegranate, and Mint

2-3 beets, preferably golden or candy-striped

1 cup quinoa
1-2 ounces of feta cheese, crumbled (about ¼ cup)
Seeds from half a pomegranate
1/3 cup freshly chopped mint

Juice of ½ a lemon
¼ cup good quality oil
Salt and pepper to taste

Preheat oven to 400F. Wrap each beet in foil and place the wrapped beets in a baking pan to catch any juice that tries to escape. Roast for 1 hour, turning at least once to prevent burning on the spot touching the pan. Unwrap and leave until cool enough to handle, then peel each beet.* Cut beets into a medium dice – cut in half, cut each half in half or thirds depending on size, then slice 1/8 inch thick. Season with salt.

Place quinoa and 2 cups of water into a medium size sauce pan and bring to a boil. Cover, turn heat to low, and cook for about 15 minutes. Quinoa should not be crunchy when finished and the many of the rings around each grain should have separated. Let cool to room temperature.

Combine quinoa, lemon juice and oil in a serving bowl. Add salt and pepper to taste, keeping in mind that the feta will add additional salt. Arrange beets, feta, mint, and pomegranate seeds on top. Mix just before serving to prevent beets from dying quinoa pink and gold. Serve cold or at room temperature.

*I find it much easier to peel beets after they’re roasted. I also find this easier, and less messy, than the traditional method of rubbing each beet with a (paper) towel to remove the skin.

Friday, January 13, 2012

Ham and Cheddar Pretzel Bites

I’ve loved Top Chef since the beginning and while I don’t have cable anymore, I watch it whenever I get the chance on other people’s televisions. It’s been quite a few seasons so at this point I’m used to the contestants being relatively unknown, even if they’re listed as chef in their own restaurant. So imagine my surprise when flipping through back issues of Gourmet magazine I turn a page and there’s Edward Lee in an issue from 2009.

HamAndCheddarPretzels_ham.jpg

Let’s just put this out there now, I really like Edward Lee. His cooking is always interesting and well-executed and he avoids the unnecessary drama that seems to invade the show more and more each year. (Side note: did anyone else think the episode when they made the contestants judge each other was just an attempt to get more drama into this season which had until that point been mostly drama free? Ugh.) Edward is one of my favorites to win this year so I was really excited to see a whole spread on him and his restaurant, 610 Magnolia, in Kentucky. The article included several recipes for his Southern-meets-Korean food but it was the recipe for ham and cheddar pretzel bites that really caught my eye.

PretzelBites_EyeLevelMakingOf

I was excited about the challenge of making pretzels, but I was blown away by the results.
This is seriously one of the best foods I have ever made and it will definitely join my list of foods that are great for a potluck. Often when I make something snack-like, we eat them for a day or two and then everyone else loses interest while I slowly finish them over the next few days. Not so with these pretzels – 4 dozen bites gone within 3 days and the next day my boyfriend checked the cookie jar and sadly noted that the pretzels were still gone.

PretzelBites_OverheardMakingOf

These can easily be made vegetarian by taking out the ham and increasing the amount of cheese. The original recipe called served these with a homemade jalapeno honey mustard but I opted to instead add some diced serrano pepper to the filling and eat them with some honey mustard we already had. They are just as delicious with or without the mustard. They’re really best the day you make them because the salt starts to soften after about 24 hours. You can fix this by either making a half batch (but then there are fewer bites, why would you do that?) or by baking the whole batch and then brushing them with melted butter and topping them with salt when you want to eat them. Keep in mind that if you use oil instead of butter the salt won’t stick as well; since butter is solid at room temperature it will help the salt stay in place, unlike oil which will do little to stop the salt from sliding off.

PretzelBites_Baked

I’m hoping to see Edward Lee or Paul Qui take the title this year. Who are you rooting for on Top Chef Texas?

Ham and Cheddar Pretzel Bites
Adapted from Gourmet, October 2009

Makes 4 dozen bites

1 ½ tsp active dry yeast
1 tsp plus 2 tbs packed light brown sugar, divided
¼ cup warm water (85-100F)
1 cup warm buttermilk (85-100F)
2 ½ - 3 cups all-purpose flour

½ cup finely chopped country ham
1/3 cup finely chopped sharp cheddar
1-2 serrano peppers, finely diced. Remove or leave ribs and seeds depending on your heat preference

6 cups water
4 tsp baking soda
2 tbs butter, melted
2 tbs coarse salt

Stir the yeast, 1 tsp brown sugar, and warm water together in the bowl of a stand mixer or large mixing bowl. Let stand until foamy, about 5 minutes – if your yeast doesn’t foam within 10 minutes it’s dead. Throw it out and start again with new yeast. In a separate bowl, mix the warm buttermilk and remaining 2 tbs brown sugar until dissolved.

Add 2 ½ cups flour and buttermilk mixture to yeast mixture and stir with stand mixer paddle attachment (on medium speed) or wooden spoon until a soft dough forms. Add more flour if necessary, the dough should be soft and tacky but it should not stick to your hands when you press it lightly. Switch to a dough hook and knead on low for about a minute or turn the dough out on a floured surface and knead with your hands for 1-2 minutes until a smooth ball forms. Place the dough in an oiled bowl and cover with plastic wrap or a clean dishtowel. Let it rise at room temperature until doubled, about 2 hours.

Preheat oven to 400F with racks in the upper and lower third of the oven. Line two baking sheets with parchment paper.

Turn out the risen dough onto a floured surface and divide into 4 equal parts. Take one part and gently roll it into a log about 12 inches long. Then gently roll it out with a rolling pin to create a 12 by 4 inch rectangle. Press one-quarter of the ham, cheese, and diced peppers in the bottom third of the rectangle, leaving a half inch border at the bottom edge. Stretch the bottom edge of the dough over the filling and press to seal it. Then roll up the dough as tightly as possible to form a rope with the filling inside. Cut the rope into twelve even pieces and lightly pinch the cut edges to partially seal them. Put the cut pieces on a baking sheet and repeat the process with the remaining dough and filling.

Bring 6 cups of water to a boil, then reduce the heat to a simmer and add the baking soda. Cook the pretzel bites in batches in the simmering water, turning them once, until they are slightly puffed up, about 20 seconds. Transfer them with a slotted spoon baking to the baking sheets. * Keep a close eye on them, they puff up quickly. *

Bake for 7 minutes, rotate the pans to ensure even browning, then bake for another 7 minutes or until the bites are puffed and golden brown. Brush warm pretzels with melted butter and sprinkle with salt. Eat warm or at room temperature, with or without mustard.