
Monday, February 6, 2012
Friday, February 3, 2012
How to - Brown Rice
Ahhh, brown rice. Brown rice is one of those foods that gets a bad rap for being “healthy.” I don’t mean healthy in that whole grains are good for you or that it has a lot of fiber as well as important vitamins minerals that are often stripped from white rice. No, I mean it is called “healthy” because when made at home it often doesn’t taste good and it’s only redeeming quality is its health value. Kind of like hearing that your blind date “has a good personality,” describing a food as healthy first has a way of decreasing your expectations for its actual flavor.
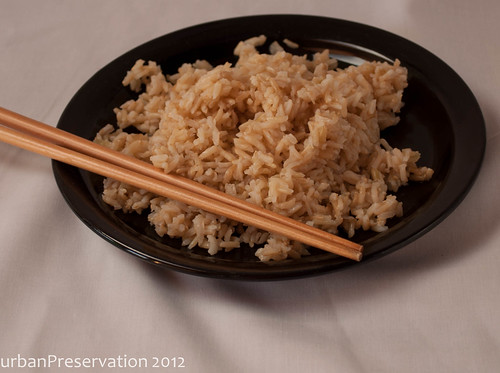
So let’s ignore the fact that brown rice is actually good for you. Brown rice is delicious – it’s nutty and chewy and actually adds something other than starch to your dish. Ok, a lot of brown rice is kind of gummy or crunchy but when it’s cooked well, brown rice can be amazing. Over the years I’ve cooked a lot of slightly under and over cooked brown rice. I’ve even been able to achieve the both over- and undercooked version of brown rice – you know, the one where the rice is both soggy and unpleasantly crunchy?
There are lots of recipes out there with varying levels of complexity. But I really think that rice should be easy to make – it should not require multiple techniques or an hour to bring a staggering volume of water to a boil. It should be that think you make to go with the leftovers from last night and it should be on the table within an hour and it should take you no more than 10 minutes of active time. Are you with me?
You will need:
Oven-safe medium sized pot with oven=proof lid – you can make a lid out of tinfoil if your lid isn’t oven safe.
1 2/3 or 2 cups water
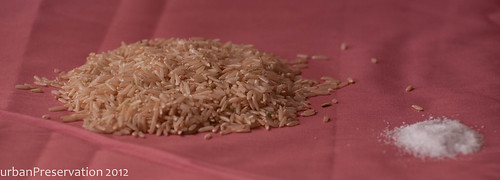
1 tsp kosher salt – this is key, do not leave it out. Salt helps to mask bitter flavors and enhance sweet and savory ones. The resulting rice will taste better if it’s salted, no matter what method you choose.
1 cup Long grain brown rice – no short or medium grain here, they are too apt to get mushy and while that works in some cases, it’s not what we’re looking for here.
1 tbs olive oil (optional)
How to – baked brown rice
Adapted from How to Cook Everything by Mark Bittman
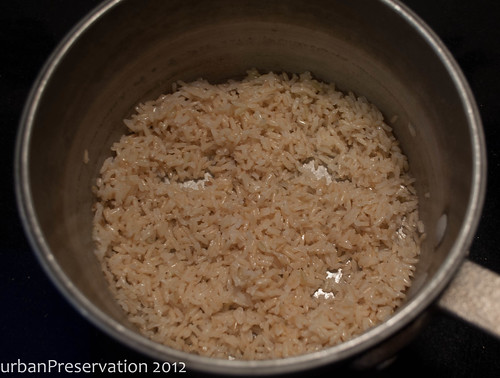
Step 1. Preheat over to 350F.
Optional Step 1(a). Heat the olive oil in the pot over medium heat. Add the rice and salt and cook for two minutes.
Step 2. Add 2 cups water and bring to a boil.
Step 3. Cover pot and place in oven. Bake for 30 minutes.
Step 4. Remove rice from oven and let sit, covered, for 15 minutes (do not lift the lid until the time is up!)
Step 5. Fluff with a fork and enjoy.
How to – Stovetop* Brown Rice
*I think baked brown rice is superior to stove top since the all-around heat of the oven cooks the rice more evenly and results in rice that is chewy but not crunchy and never soggy. That said, if you still love the ease of the stovetop method, here’s the best way I’ve found to do it.
Step 1. Place the rice in a colander and rinse it thoroughly until the water runs clear and now longer contains starch.
Step 2. Place rice, salt and 1 2/3 cup water in a medium pot and bring to a boil.
Step 3. Cover the pot and turn the heat down to medium low – you still want a very gentle simmer. Set a timer for 30 minutes.
Step 4. While keeping the rice covered turn the heat off and move the pot to a cool burner or to a counter space. Let it sit and steam for 20 minutes. If you lift the lid when it comes out of the oven the rice will look wet, just let it steam and the water will absorb.
Step 5. Fluff with a fork and enjoy.
So let’s ignore the fact that brown rice is actually good for you. Brown rice is delicious – it’s nutty and chewy and actually adds something other than starch to your dish. Ok, a lot of brown rice is kind of gummy or crunchy but when it’s cooked well, brown rice can be amazing. Over the years I’ve cooked a lot of slightly under and over cooked brown rice. I’ve even been able to achieve the both over- and undercooked version of brown rice – you know, the one where the rice is both soggy and unpleasantly crunchy?
There are lots of recipes out there with varying levels of complexity. But I really think that rice should be easy to make – it should not require multiple techniques or an hour to bring a staggering volume of water to a boil. It should be that think you make to go with the leftovers from last night and it should be on the table within an hour and it should take you no more than 10 minutes of active time. Are you with me?
You will need:
Oven-safe medium sized pot with oven=proof lid – you can make a lid out of tinfoil if your lid isn’t oven safe.
1 2/3 or 2 cups water
1 tsp kosher salt – this is key, do not leave it out. Salt helps to mask bitter flavors and enhance sweet and savory ones. The resulting rice will taste better if it’s salted, no matter what method you choose.
1 cup Long grain brown rice – no short or medium grain here, they are too apt to get mushy and while that works in some cases, it’s not what we’re looking for here.
1 tbs olive oil (optional)
How to – baked brown rice
Adapted from How to Cook Everything by Mark Bittman
Step 1. Preheat over to 350F.
Optional Step 1(a). Heat the olive oil in the pot over medium heat. Add the rice and salt and cook for two minutes.
Step 2. Add 2 cups water and bring to a boil.
Step 3. Cover pot and place in oven. Bake for 30 minutes.
Step 4. Remove rice from oven and let sit, covered, for 15 minutes (do not lift the lid until the time is up!)
Step 5. Fluff with a fork and enjoy.
How to – Stovetop* Brown Rice
*I think baked brown rice is superior to stove top since the all-around heat of the oven cooks the rice more evenly and results in rice that is chewy but not crunchy and never soggy. That said, if you still love the ease of the stovetop method, here’s the best way I’ve found to do it.
Step 1. Place the rice in a colander and rinse it thoroughly until the water runs clear and now longer contains starch.
Step 2. Place rice, salt and 1 2/3 cup water in a medium pot and bring to a boil.
Step 3. Cover the pot and turn the heat down to medium low – you still want a very gentle simmer. Set a timer for 30 minutes.
Step 4. While keeping the rice covered turn the heat off and move the pot to a cool burner or to a counter space. Let it sit and steam for 20 minutes. If you lift the lid when it comes out of the oven the rice will look wet, just let it steam and the water will absorb.
Step 5. Fluff with a fork and enjoy.
Thursday, February 2, 2012
Celeriac Gratin
Winter can mean a lot of different things – growing up it meant hot chocolate, sledding, and praying for snow days. Now that I live in Northern California it means intermittent rain, citrus, and running around on the beach (I know, it’s weird here). But despite the differences, winter still means root vegetables – roasted, baked, or made into soups. And for me, root vegetables means celeriac.
Chances are you have seen celeriac, or celery root, at the grocery store, and then walked right by hoping not to catch its eye. I mean, it’s a big knobby thing with weird root protrusions sticking out all over it and probably large clumps of dirt and perhaps some awkward green shoots coming off the top. It is the awkward teenager of the vegetable world and as a result, is not always well loved. But I love it –and no I’m not just trying to be a hipster here; I want everyone to love it. That ugly exterior is easy to cut away and the flavor is surprisingly crisp, juicy, and fresh. Sort of like celery but without the overwhelming greenness and no threads to pick out of your teeth afterwards. Unlike most root vegetables, celeriac is just as good raw as it is cooked and it’s great in winter salads. And that’s great for those times when you just cannot look at another stick of butter – but I haven’t reached that point just yet.
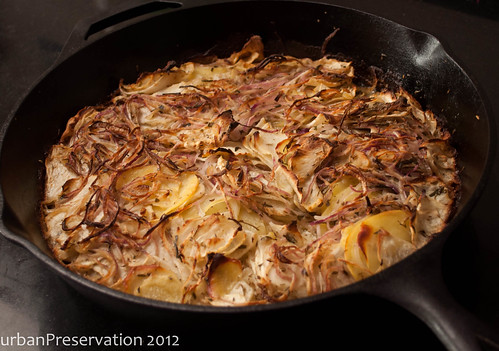
When I think of winter food, I think of hot and filling, stick-to-your-ribs kind of food. And in the vegetable world, that food is gratin. Potatoes are the king of comfort food (or at least in the running) so it seems unfair that they get all the love when it comes to gratin as well. Yes, this gratin has some potatoes too, but the star is really the celeriac. And unlike most gratins it has no cheese. No cheese, you say? Yes, well, it gets along just fine without it thanks. Seriously, I may even prefer this to the traditional cheesy gratin. It’s rich but not dense in the way that a lot of gratins are and as a result it feels just fine to eat two pieces for dinner.
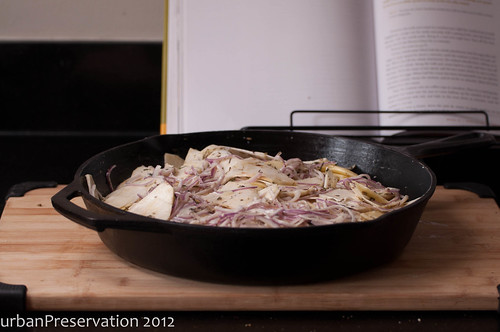
Gratin, like all dishes made of baked vegetables, will turn out best if you make sure to cut all your vegetable pieces to approximately equal widths so they cook evenly. There are two ways to accomplish this: have amazing knife skills or use a mandoline. I took the second route. A year or so ago I bought myself a Benriner mandoline (and some Kevlar gloves to protect my fingers, since I hate that hand guard that comes with it) and I haven’t looked back – it makes meals that much easier to prepare and it takes up very little space in my kitchen.
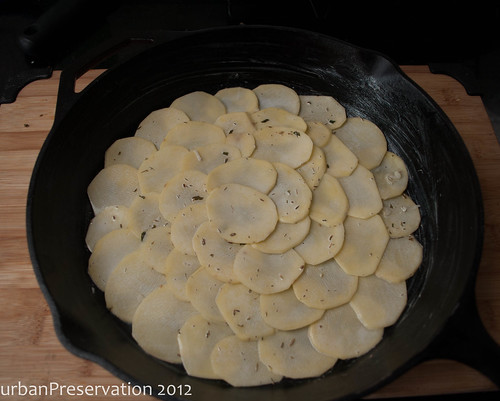
This gratin is excellent baked in a cast iron pan for extra browning but it would be just as good in a 9 by 13 Pyrex dish. Because it doesn’t have cheese to keep it stuck together, it’s best to cook it ahead of time and reheat it before serving so that it has some time to bind itself together. Or if, like me, you just can’t wait for that first slice, serve it warm from the oven and just a little bit messy.
Celeriac Gratin
Inspired by Fennel Gratin in Sunday Suppers at Lucques by Suzanne Goin
1 tbs fennel seeds
1 pound potatoes – preferably Yukon gold or red bliss – I prefer to not peel them and just wash them thoroughly
2/3 cup heavy cream
1 ½ pound celeriac root
1 thinly sliced red onion
1 tbs thyme leaves
1/2 tbs tarragon
1/3 cup olive oil
1 tsp plus 2 tsp kosher salt
Preheat oven to 425F.
Add fennel seeds to a dry pan and place over medium heat. Toast for 2-3 minutes or until seeds are fragrant and barely browned.
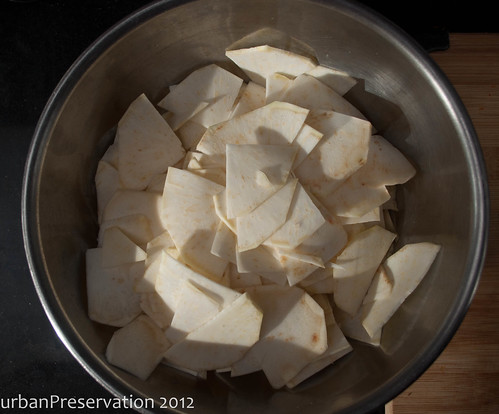
Slice the potatoes into 1/16 inch slices - 1/8 if using a knife instead of a mandoline. You may need to halve the potatoes if they’re too big but the resulting slices should be about the same size as the celeriac. Toss the potatoes with cream and 2 tsp salt.*
Cut the ends off the celeriac so it will stand on a cutting board and cut the rest of the outer layer off in strips, working your knife from top to bottom. Quarter the remaining root and slice into approximately 1/16 inch slices (1/8 if using a knife). Add the celeriac slices, fennel seed, thyme, red onion, and olive oil to the potato and cream mixture. Season with 1 tsp salt and mix until well combined.
Grease a 10 inch cast iron skillet or a 9 by 13 Pyrex dish and lined the bottom of the pan with overlapping slices of potato. Arrange the remaining potato and celeriac mixture in the dish.**
Bake the gratin for about 45 minutes, until golden brown in spots and the onions on the top are slightly crispy. Let cool at least 30 minutes before slicing.
*Tossing the potatoes with cream right after they’re cut coats them and prevents them from browning.
** You can choose to artfully arrange all the slices one at a time but I find this tedious. Just lining the bottom will help make it easier to lift out slices and creates some of that tidy pattern without taking as much time.
Chances are you have seen celeriac, or celery root, at the grocery store, and then walked right by hoping not to catch its eye. I mean, it’s a big knobby thing with weird root protrusions sticking out all over it and probably large clumps of dirt and perhaps some awkward green shoots coming off the top. It is the awkward teenager of the vegetable world and as a result, is not always well loved. But I love it –and no I’m not just trying to be a hipster here; I want everyone to love it. That ugly exterior is easy to cut away and the flavor is surprisingly crisp, juicy, and fresh. Sort of like celery but without the overwhelming greenness and no threads to pick out of your teeth afterwards. Unlike most root vegetables, celeriac is just as good raw as it is cooked and it’s great in winter salads. And that’s great for those times when you just cannot look at another stick of butter – but I haven’t reached that point just yet.
When I think of winter food, I think of hot and filling, stick-to-your-ribs kind of food. And in the vegetable world, that food is gratin. Potatoes are the king of comfort food (or at least in the running) so it seems unfair that they get all the love when it comes to gratin as well. Yes, this gratin has some potatoes too, but the star is really the celeriac. And unlike most gratins it has no cheese. No cheese, you say? Yes, well, it gets along just fine without it thanks. Seriously, I may even prefer this to the traditional cheesy gratin. It’s rich but not dense in the way that a lot of gratins are and as a result it feels just fine to eat two pieces for dinner.
Gratin, like all dishes made of baked vegetables, will turn out best if you make sure to cut all your vegetable pieces to approximately equal widths so they cook evenly. There are two ways to accomplish this: have amazing knife skills or use a mandoline. I took the second route. A year or so ago I bought myself a Benriner mandoline (and some Kevlar gloves to protect my fingers, since I hate that hand guard that comes with it) and I haven’t looked back – it makes meals that much easier to prepare and it takes up very little space in my kitchen.
This gratin is excellent baked in a cast iron pan for extra browning but it would be just as good in a 9 by 13 Pyrex dish. Because it doesn’t have cheese to keep it stuck together, it’s best to cook it ahead of time and reheat it before serving so that it has some time to bind itself together. Or if, like me, you just can’t wait for that first slice, serve it warm from the oven and just a little bit messy.
Celeriac Gratin
Inspired by Fennel Gratin in Sunday Suppers at Lucques by Suzanne Goin
1 tbs fennel seeds
1 pound potatoes – preferably Yukon gold or red bliss – I prefer to not peel them and just wash them thoroughly
2/3 cup heavy cream
1 ½ pound celeriac root
1 thinly sliced red onion
1 tbs thyme leaves
1/2 tbs tarragon
1/3 cup olive oil
1 tsp plus 2 tsp kosher salt
Preheat oven to 425F.
Add fennel seeds to a dry pan and place over medium heat. Toast for 2-3 minutes or until seeds are fragrant and barely browned.
Slice the potatoes into 1/16 inch slices - 1/8 if using a knife instead of a mandoline. You may need to halve the potatoes if they’re too big but the resulting slices should be about the same size as the celeriac. Toss the potatoes with cream and 2 tsp salt.*
Cut the ends off the celeriac so it will stand on a cutting board and cut the rest of the outer layer off in strips, working your knife from top to bottom. Quarter the remaining root and slice into approximately 1/16 inch slices (1/8 if using a knife). Add the celeriac slices, fennel seed, thyme, red onion, and olive oil to the potato and cream mixture. Season with 1 tsp salt and mix until well combined.
Grease a 10 inch cast iron skillet or a 9 by 13 Pyrex dish and lined the bottom of the pan with overlapping slices of potato. Arrange the remaining potato and celeriac mixture in the dish.**
Bake the gratin for about 45 minutes, until golden brown in spots and the onions on the top are slightly crispy. Let cool at least 30 minutes before slicing.
*Tossing the potatoes with cream right after they’re cut coats them and prevents them from browning.
** You can choose to artfully arrange all the slices one at a time but I find this tedious. Just lining the bottom will help make it easier to lift out slices and creates some of that tidy pattern without taking as much time.
Wednesday, February 1, 2012
Spinach Uttapam
Sometimes a recipe comes about because I have a specific idea of what I want to make. But more often than not, what I cook is based at least in part on what item in the fridge needs to be used in the next day or two. That was what happened with a bunch of spinach the other day, which I either had to use or lose. When this happens the result is one of two things –the dish is fine but nothing I’ll ever make again and we may or may not eat the leftovers, or it is amazingly delicious and I forget to write down the recipe and I never make it again.
This time, I wrote down the recipe. Then I lost it, then I found it again. You’re welcome.

Uttapam (rhymes with “You da’ bomb” – oooh, sometimes I am so corny I amaze even myself) is a kind of savory pancake that’s common in South Indian cuisine. Never had one? Well most Indian restaurants in the US are Northern Indian but I am lucky enough to live near an excellent South Indian restaurant that specializes in dosa, which are a crepe-style version of the batter used for uttapam. For dosa, the filling is wrapped in the crispy cooked dough but for uttapam, the filling is mixed into the batter, kind of like a savory version of chocolate chip pancakes. Except the uttapam I made used semolina flour which is traditional for rava uttapam, the style I was emulating.
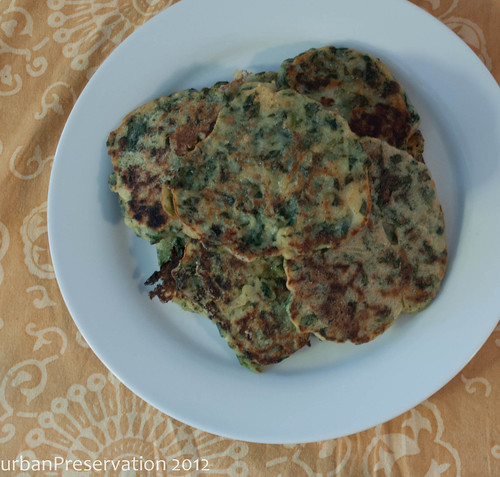
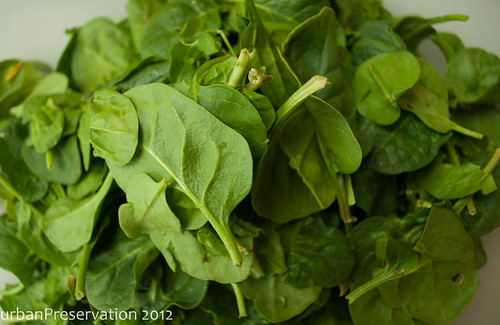
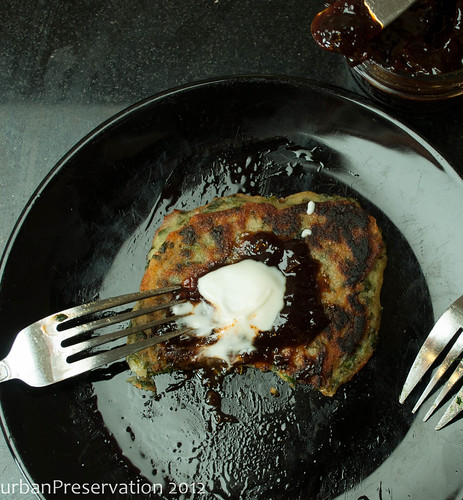
Please make these. I make no promises to their authenticity but to me they taste similar to the ones I’ve ordered in restaurants. And more importantly, they are delicious. When I was testing them I initially made the batter too thick so my roommate and I ate several before calling them a success. She then graciously offered to eat the rest, “You know, if you need any more help figuring out if they’re good.” What a trooper. But seriously, these are no more difficult to make than pancakes and the end result is well worth it. Don’t limit yourself to spinach – what about leftover curry, some chickpea salad, roasted vegetables – just make sure to get out as much liquid as possible before adding the filling to the batter, otherwise it will end up too thin (and in the case of spinach filling it will also turn greenish; not appetizingI ate these for lunch, heated a few in the toaster oven for a snack, and then when I came back to look for them, they were gone. Served with some chutney and yogurt, they have a tendency to disappear fast.
Spinach Uttapam
Makes about a dozen
For the filling:
2 tsp neutral oil
1 tbs fresh ginger, grated
2 cloves garlic, finely chopped
½ lb spinach, fresh or frozen – if frozen make extra sure to squeeze all the liquid out
½ tsp garam masala
1 tsp kosher salt
For the batter:
¾ cup yogurt
½ cup cake flour*
½ tsp each ground cumin, mustard, and coriander
1 tsp fresh ginger, grated
1 ½ cups semolina
2 tsp salt
1 – 1 ½ cups water – depending on what thickness you want
Put the oil, ginger, and garlic in a cold pan and place over medium heat.**Cook for a minute or two, until the garlic is light brown. Add the spinach, salt, and garam masala and cook for three to five minutes, until the spinach is entirely cooked down. If using frozen spinach, cook until some the moisture has evaporated and the ingredients are well mixed. Remove from heat and move spinach mixture to a small-holed strainer. Press the spinach against the side of the strainer to remove as much liquid as possible. Roughly chop the remaining mixture and set aside.
In a larger bowl, mix yogurt, cake flour, spices, ginger, semolina flour, and salt together until well combined. Add 1 cup of water and spinach mixture and stir to incorporate fully. If needed, add up to ½ cup additional water to reach your desired consistency – I like a thinner pancake so I added the full 1 ½ cups.
Heat a pan over medium heat and pour in a few spoonfuls of oil to coat the pan. Fry pancakes until golden brown, about 3-4 minutes a side. Serve warm or at room temperature.
*Uttapam is traditionally made with rice flour, which I didn’t have. Cake flour has a similar gluten content so I used it instead. Feel free to use either
** Using a cold pan and cold oil allows the ginger and garlic to flavor the oil without burning
This time, I wrote down the recipe. Then I lost it, then I found it again. You’re welcome.
Uttapam (rhymes with “You da’ bomb” – oooh, sometimes I am so corny I amaze even myself) is a kind of savory pancake that’s common in South Indian cuisine. Never had one? Well most Indian restaurants in the US are Northern Indian but I am lucky enough to live near an excellent South Indian restaurant that specializes in dosa, which are a crepe-style version of the batter used for uttapam. For dosa, the filling is wrapped in the crispy cooked dough but for uttapam, the filling is mixed into the batter, kind of like a savory version of chocolate chip pancakes. Except the uttapam I made used semolina flour which is traditional for rava uttapam, the style I was emulating.
Please make these. I make no promises to their authenticity but to me they taste similar to the ones I’ve ordered in restaurants. And more importantly, they are delicious. When I was testing them I initially made the batter too thick so my roommate and I ate several before calling them a success. She then graciously offered to eat the rest, “You know, if you need any more help figuring out if they’re good.” What a trooper. But seriously, these are no more difficult to make than pancakes and the end result is well worth it. Don’t limit yourself to spinach – what about leftover curry, some chickpea salad, roasted vegetables – just make sure to get out as much liquid as possible before adding the filling to the batter, otherwise it will end up too thin (and in the case of spinach filling it will also turn greenish; not appetizingI ate these for lunch, heated a few in the toaster oven for a snack, and then when I came back to look for them, they were gone. Served with some chutney and yogurt, they have a tendency to disappear fast.
Spinach Uttapam
Makes about a dozen
For the filling:
2 tsp neutral oil
1 tbs fresh ginger, grated
2 cloves garlic, finely chopped
½ lb spinach, fresh or frozen – if frozen make extra sure to squeeze all the liquid out
½ tsp garam masala
1 tsp kosher salt
For the batter:
¾ cup yogurt
½ cup cake flour*
½ tsp each ground cumin, mustard, and coriander
1 tsp fresh ginger, grated
1 ½ cups semolina
2 tsp salt
1 – 1 ½ cups water – depending on what thickness you want
Put the oil, ginger, and garlic in a cold pan and place over medium heat.**Cook for a minute or two, until the garlic is light brown. Add the spinach, salt, and garam masala and cook for three to five minutes, until the spinach is entirely cooked down. If using frozen spinach, cook until some the moisture has evaporated and the ingredients are well mixed. Remove from heat and move spinach mixture to a small-holed strainer. Press the spinach against the side of the strainer to remove as much liquid as possible. Roughly chop the remaining mixture and set aside.
In a larger bowl, mix yogurt, cake flour, spices, ginger, semolina flour, and salt together until well combined. Add 1 cup of water and spinach mixture and stir to incorporate fully. If needed, add up to ½ cup additional water to reach your desired consistency – I like a thinner pancake so I added the full 1 ½ cups.
Heat a pan over medium heat and pour in a few spoonfuls of oil to coat the pan. Fry pancakes until golden brown, about 3-4 minutes a side. Serve warm or at room temperature.
*Uttapam is traditionally made with rice flour, which I didn’t have. Cake flour has a similar gluten content so I used it instead. Feel free to use either
** Using a cold pan and cold oil allows the ginger and garlic to flavor the oil without burning
Tuesday, January 31, 2012
Honey Salted Caramels
I’m a dessert kind of person – I feel like a meal just isn’t complete without a little bit of sweetness to cap it off. I don’t need a big slice of pie or scoop of ice cream after every meal, but I do appreciate a little taste of something sweet after dinner to signify the meal is over. Chocolate is fine but mostly what I want is candy. So I made some. You should too.

Candy making is not very difficult since it’s mostly playing with sugar temperatures to manipulate the granules into a different texture. The problems lies not in its complexity but the fact that sugar burns and it also takes a while to heat up, increasing the chance that you will lose interest and walk away only to return to find sugar burned to the bottom of a pan. But home candy making is not something you should be intimidated about. It does require some special equipment (a candy thermometer) but it’s a relatively easy task once you have that. Plus, the cost of messing up a batch is pretty small – just a few cups of sugar are wasted since it’s generally in the sugar cooking stage that things tend to go wrong. The real key here is: don’t walk away from the stove. Just don’t. It might be boring to stand and watch the sugar darken but if you walk away it will burn. Make a game of it, dance around, practice counting in foreign languages, whatever you have to do; but don’t walk away.
The 1000 pound gorilla in the room when it comes to home candy making is corn syrup. Yes, corn syrup is in most recipes for home candy making. The problem is that while sugar can be melted into a liquid to form a chewy delicious treat, it really wants to stay in granule form. So if the pan is moved too much when you make the candy, the sugar has a tendency to recrystallize, thus ruining all your hard work. Using corn syrup, or any liquid sweetener high in glucose, helps prevent that recrystallization since glucose doesn’t crystalize. But with all the concerns about high fructose corn syrup (which is not the same as home use corn syrup), and the fact that most plain corn syrup is made with GMO corn, it can be a sticky subject. I’m not saying I don’t cook with corn syrup – in some cases it’s really the only option for high glucose liquid sweetener – but when I can find a way to avoid it, I will.
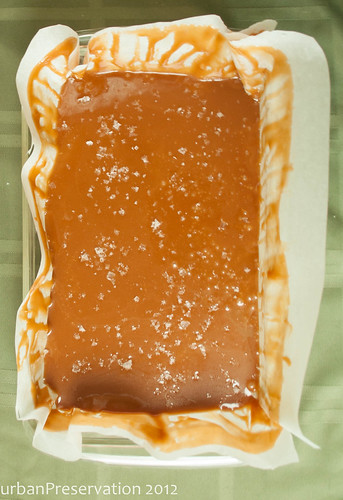
In the case of these caramels, honey plays the role of high-glucose liquid sweetener to prevent your chewy sweets from becoming full of hard sugar crystals. The end result is definitely honey flavored which is a nice added dimension to these sweets. It’s also a great beginner caramel recipe since the honey adds some color to the caramel so you don’t need to cook the sugar as much to get a deep golden color. I’ve been enjoying these for two weeks now and they’re still just as chewy and delicious as the first day.
Worried about cleaning that pan? Don’t be – place all your sugar-coated implements (no judgment; just getting clean) into the caramel pan and put it all in the sink. Boil a kettle of water and pour the just-boiled water into the pan, making sure to get all the little splashes of caramel. Let it sit for a few minutes, then give everything a gentle scrub. Clean pan, delicious candy, no sweat.

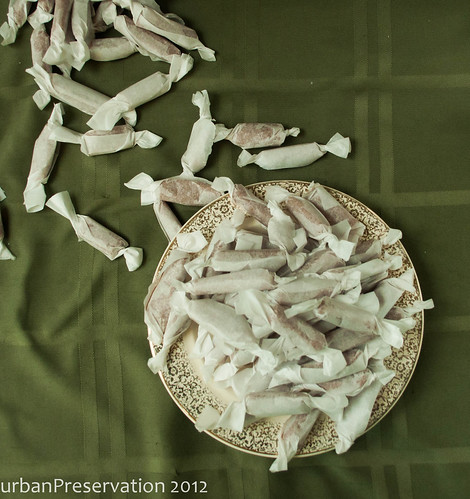
Honey Salted Caramels
Adapted from Chez Pim
1 ½ cups sugar
½ cup honey
1 cup heavy cream
½ stick (4 oz) butter, softened to room temperature, cut into half-inch cubes
1 tsp kosher salt plus additional for sprinkling.
Pour cream into a small saucepan and put on very low heat to simmer.*
Place honey and sugar in a pot over medium heat. Cook until caramelized to the color you want in your caramels. Shake or swirl the pot to get sugar crystals to melt but don’t stir – that encourages recrystallization.
When the sugar reaches your desired color, whisk in butter a few pieces at a time. Once all the butter is incorporated, whisk in the cream and add salt.** Attach your candy thermometer to the pan and cook the mixture until it reaches 260F.
Pour the hot caramel onto a baking sheet lined with parchment paper. Cool for 8-10 minutes, then sprinkle evenly with salt; I used Maldon sea salt. Let caramels cool completely, 3-6 hours, before cutting. Cut into bite-sized pieces with scissors or a well-greased knife. Wrap individual caramels in parchment or waxed paper.
*Adding cold cream to the caramels will cause the caramel to seize and the cream to curdle.
**When the cream is added the mixture will bubble up a bit. Be prepared.
Candy making is not very difficult since it’s mostly playing with sugar temperatures to manipulate the granules into a different texture. The problems lies not in its complexity but the fact that sugar burns and it also takes a while to heat up, increasing the chance that you will lose interest and walk away only to return to find sugar burned to the bottom of a pan. But home candy making is not something you should be intimidated about. It does require some special equipment (a candy thermometer) but it’s a relatively easy task once you have that. Plus, the cost of messing up a batch is pretty small – just a few cups of sugar are wasted since it’s generally in the sugar cooking stage that things tend to go wrong. The real key here is: don’t walk away from the stove. Just don’t. It might be boring to stand and watch the sugar darken but if you walk away it will burn. Make a game of it, dance around, practice counting in foreign languages, whatever you have to do; but don’t walk away.
The 1000 pound gorilla in the room when it comes to home candy making is corn syrup. Yes, corn syrup is in most recipes for home candy making. The problem is that while sugar can be melted into a liquid to form a chewy delicious treat, it really wants to stay in granule form. So if the pan is moved too much when you make the candy, the sugar has a tendency to recrystallize, thus ruining all your hard work. Using corn syrup, or any liquid sweetener high in glucose, helps prevent that recrystallization since glucose doesn’t crystalize. But with all the concerns about high fructose corn syrup (which is not the same as home use corn syrup), and the fact that most plain corn syrup is made with GMO corn, it can be a sticky subject. I’m not saying I don’t cook with corn syrup – in some cases it’s really the only option for high glucose liquid sweetener – but when I can find a way to avoid it, I will.
In the case of these caramels, honey plays the role of high-glucose liquid sweetener to prevent your chewy sweets from becoming full of hard sugar crystals. The end result is definitely honey flavored which is a nice added dimension to these sweets. It’s also a great beginner caramel recipe since the honey adds some color to the caramel so you don’t need to cook the sugar as much to get a deep golden color. I’ve been enjoying these for two weeks now and they’re still just as chewy and delicious as the first day.
Worried about cleaning that pan? Don’t be – place all your sugar-coated implements (no judgment; just getting clean) into the caramel pan and put it all in the sink. Boil a kettle of water and pour the just-boiled water into the pan, making sure to get all the little splashes of caramel. Let it sit for a few minutes, then give everything a gentle scrub. Clean pan, delicious candy, no sweat.
Honey Salted Caramels
Adapted from Chez Pim
1 ½ cups sugar
½ cup honey
1 cup heavy cream
½ stick (4 oz) butter, softened to room temperature, cut into half-inch cubes
1 tsp kosher salt plus additional for sprinkling.
Pour cream into a small saucepan and put on very low heat to simmer.*
Place honey and sugar in a pot over medium heat. Cook until caramelized to the color you want in your caramels. Shake or swirl the pot to get sugar crystals to melt but don’t stir – that encourages recrystallization.
When the sugar reaches your desired color, whisk in butter a few pieces at a time. Once all the butter is incorporated, whisk in the cream and add salt.** Attach your candy thermometer to the pan and cook the mixture until it reaches 260F.
Pour the hot caramel onto a baking sheet lined with parchment paper. Cool for 8-10 minutes, then sprinkle evenly with salt; I used Maldon sea salt. Let caramels cool completely, 3-6 hours, before cutting. Cut into bite-sized pieces with scissors or a well-greased knife. Wrap individual caramels in parchment or waxed paper.
*Adding cold cream to the caramels will cause the caramel to seize and the cream to curdle.
**When the cream is added the mixture will bubble up a bit. Be prepared.
Monday, January 30, 2012
Winter Panzanella
Remember a few weeks ago I mentioned buying a bunch of beets and having a few leftover? (No? Well I’ll wait right here while you catch up.) I bought them primarily to make a winter version of panzanella, another in my list of fancy sounding dishes that do not actually take much work to put together. Panzanella is generally a summer dish but the real genius of it is that it uses stale bread to form the bulk of the salad.
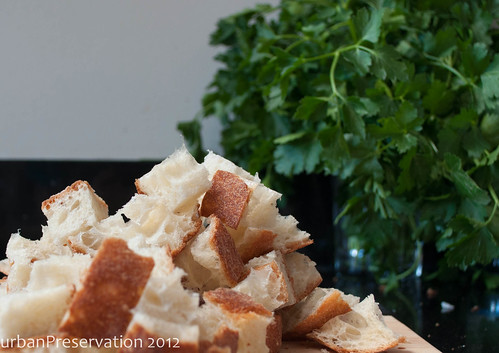
San Francisco is a town that takes its bread seriously and there are lots of good inexpensive bread to be had pretty much everywhere you go. As a result, we often have half a loaf of something laying around that should have been eaten on the day we bought it, which was generally at least three days ago. I’ll admit I’m not above eating slightly stale bread but there comes a point when the loaf cracks when you cut it and at that point, even I can’t bring myself to eat a slice. Yes, this is perfect for making breadcrumbs, but there are only so many breadcrumbs you can have before you have to look for other ways to use stale bread.
Panzanella combines leftover stale bread with salad ingredients which softens the bread and makes it partly chewy and partly crunchy. But in winter, I won’t be caught dead putting sad mealy tomatoes in my salad so I had to come up with a variety of winter ingredients to substitute for the traditional flavors and textures. Traditionally, panzanella has tomatoes, cucumber and/or bell pepper, red onion, and basil along with vinaigrette and maybe some parmesan. So that’s something sweet and juicy, something crunchy and juicy, something sharp, an herb to tie it together, and an optional cheese.
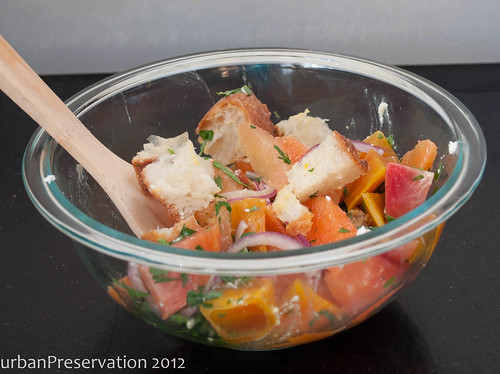
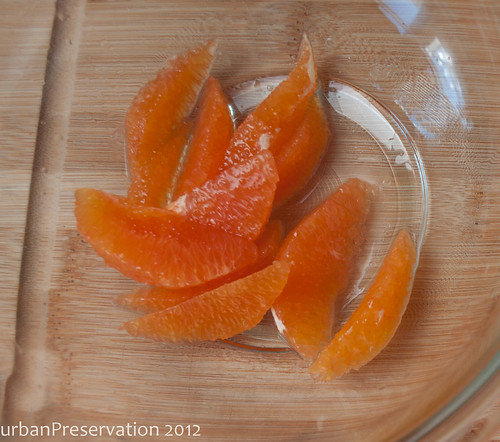
Beets are everywhere in the winter and I love their juicy yet firm texture. Red beets would be too sweet in this situation but the golden and candystriped beets I used aren’t as sweet and as a bonus, they aren’t as likely to dye all the other ingredients bright pink. For the juicy and sweet element, citrus fruits were the obvious choice since the varieties are endless, especially in winter. I used a grapefruit, two cara cara oranges (which are pink inside!) and a mandarin for this recipe, supremed of course, but any kind of citrus will do. The herbal element became parsley, the red onions stayed, and the cheese was played by a few ounces of feta.
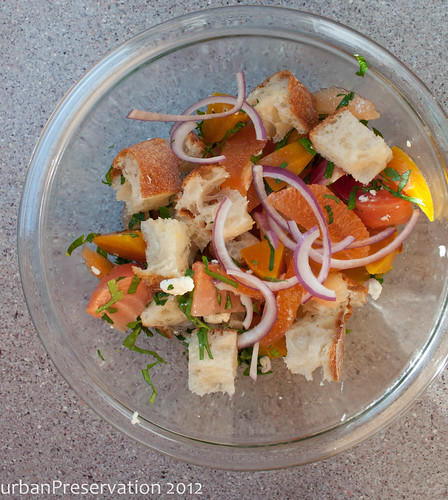
Mix the salad together about 15 minutes before you plan to eat it, to allow the bread time to soften, but I find this is one of those things that really does not hold up in the fridge overnight. If I have more that I know will be eaten in one meal, I might save the extra salad ingredients separate from the bread cubes so the next day’s batch won’t have gone from chewy to soggy. The best part about this salad is since it’s more substantial (and less virtuous feeling) that the typical lettuce variety, it can just as easily be served as a meal on its own; nothing else needed.
Winter Panzanella
4 cups of stale bread, cubed
4-5 medium sized beets, roasted, halved, and cut into slices
1 small red onion, thinly sliced
4 citrus fruits, supremed - orange, grapefruit, lemon, etc
1/2 cup finely chopped parsley
3-4 ounces crumbled feta (about 1/3 cup)
Juice of 1 lemon
1/4 cup olive oil
1 tsp mustard
2 tsp plus 1/2 tsp kosher salt
Arrange the bread cubes on a tray so that no pieces are touching and leave overnight to dry out.*
combine sliced beets, red onion, citrus segments, parsley, 2 tsp salt, and feta in a large bowl.
In a small container with a lid combine lemon juice, olive oil, mustard, and 1/2 tsp salt. Shake well for 1 minute until well combined.
15 minutes before serving, add bread cubes to the beet and citrus mixture. Pour over vinaigrette and stir to combine. Let sit for 15-30 minutes for bread to absorb juices. Serve cold or room temperature.
*If your bread is stale all the way through the loaf, you can skip this step.
San Francisco is a town that takes its bread seriously and there are lots of good inexpensive bread to be had pretty much everywhere you go. As a result, we often have half a loaf of something laying around that should have been eaten on the day we bought it, which was generally at least three days ago. I’ll admit I’m not above eating slightly stale bread but there comes a point when the loaf cracks when you cut it and at that point, even I can’t bring myself to eat a slice. Yes, this is perfect for making breadcrumbs, but there are only so many breadcrumbs you can have before you have to look for other ways to use stale bread.
Panzanella combines leftover stale bread with salad ingredients which softens the bread and makes it partly chewy and partly crunchy. But in winter, I won’t be caught dead putting sad mealy tomatoes in my salad so I had to come up with a variety of winter ingredients to substitute for the traditional flavors and textures. Traditionally, panzanella has tomatoes, cucumber and/or bell pepper, red onion, and basil along with vinaigrette and maybe some parmesan. So that’s something sweet and juicy, something crunchy and juicy, something sharp, an herb to tie it together, and an optional cheese.
Beets are everywhere in the winter and I love their juicy yet firm texture. Red beets would be too sweet in this situation but the golden and candystriped beets I used aren’t as sweet and as a bonus, they aren’t as likely to dye all the other ingredients bright pink. For the juicy and sweet element, citrus fruits were the obvious choice since the varieties are endless, especially in winter. I used a grapefruit, two cara cara oranges (which are pink inside!) and a mandarin for this recipe, supremed of course, but any kind of citrus will do. The herbal element became parsley, the red onions stayed, and the cheese was played by a few ounces of feta.
Mix the salad together about 15 minutes before you plan to eat it, to allow the bread time to soften, but I find this is one of those things that really does not hold up in the fridge overnight. If I have more that I know will be eaten in one meal, I might save the extra salad ingredients separate from the bread cubes so the next day’s batch won’t have gone from chewy to soggy. The best part about this salad is since it’s more substantial (and less virtuous feeling) that the typical lettuce variety, it can just as easily be served as a meal on its own; nothing else needed.
Winter Panzanella
4 cups of stale bread, cubed
4-5 medium sized beets, roasted, halved, and cut into slices
1 small red onion, thinly sliced
4 citrus fruits, supremed - orange, grapefruit, lemon, etc
1/2 cup finely chopped parsley
3-4 ounces crumbled feta (about 1/3 cup)
Juice of 1 lemon
1/4 cup olive oil
1 tsp mustard
2 tsp plus 1/2 tsp kosher salt
Arrange the bread cubes on a tray so that no pieces are touching and leave overnight to dry out.*
combine sliced beets, red onion, citrus segments, parsley, 2 tsp salt, and feta in a large bowl.
In a small container with a lid combine lemon juice, olive oil, mustard, and 1/2 tsp salt. Shake well for 1 minute until well combined.
15 minutes before serving, add bread cubes to the beet and citrus mixture. Pour over vinaigrette and stir to combine. Let sit for 15-30 minutes for bread to absorb juices. Serve cold or room temperature.
*If your bread is stale all the way through the loaf, you can skip this step.
Friday, January 27, 2012
How to - Supremeing Citrus
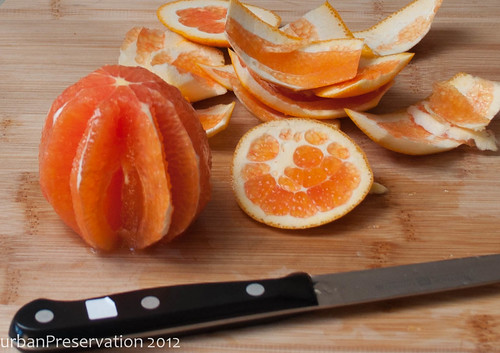
Mandarin orange slices are one of the things I remember distinctly as a food I ate as a kid and which I have almost zero interest in buying now. I don’t think my mom bought them often, but every once in a while they would show up in the pantry in their little individual cups swimming in syrup or water or whatever that liquid was. They didn’t taste particularly like oranges, more like a non-descript sweetness. But I loved them for their texture not their taste. No chewy skin, no seeds, no bitter pith. Like most mediocre foods that are acceptable to feed to children but not adults, mandarin orange slices didn’t really occupy my thoughts for many years until I watched someone on some food show “supremeing” an orange and I realized this was a way to mimic the texture of those slices while still eating something that tasted like citrus
When learning new techniques in the kitchen, I always like to weigh the complexity of the task against the difficulty the name suggests. The more impressive the name and the easier the task, the more likely I am to accomplish it. Supreme (rhymes with “pants hem”) is a fancy word for an incredibly useful technique that is not actually particularly complicated but makes people ooh and ahh when you talk about it. The end result is clean citrus slices without any bitter skin or seeds that can be easily added to salads, fruit tarts, jams, and sauces. The remaining segment-less piece of citrus can also be juiced for some additional flavor. I like to add finely chopped supremed lemon to quinoa to perk up the flavor. Or just add them to my morning yogurt. This fancy technique needs no special occasion.
You’ll need
At least 1 piece of citrus - orange, lime, lemon, grapefruit, all have excellent uses
A relatively sharp knife
Hands free of cuts and hangnails or the juice will sting – Alternatively wear non-latex gloves. I keep them around for working with chiles as well.
Step 1. Cut off the top and bottom – stem and blossom ends - of the citrus you’re working with so that it will sit flat on a cutting board.
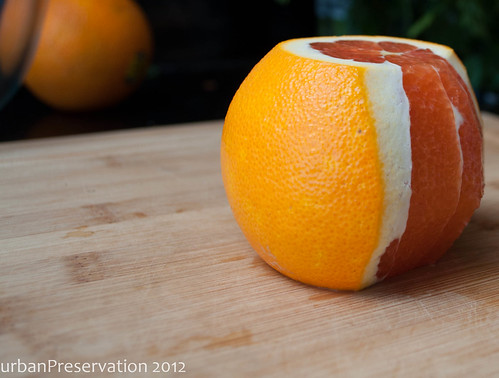
Step 2. Starting from the top and working around the natural curve of the fruit, slice away strips of the peel and pith so that the flesh of the fruit is exposed. You may cut away a large amount of fruit in the beginning but better waste some fruit than leave pith on the finished product.I find that it’s often helpful to turn the fruit upside down after cutting away all the peel, to make sure all the pith is removed as well - unlike in the picture below. The curve of the orange can hide spots.
Step 3. Holding the citrus in your hand, identify the segments of the citrus, separated by a thin white line created by the skin separating the segments.
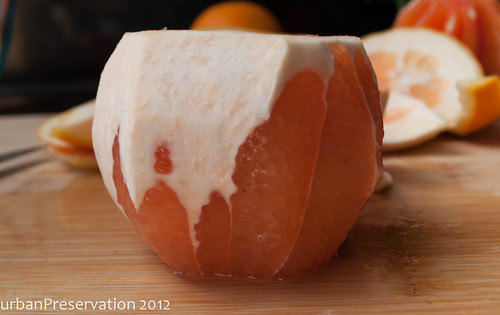
Step 4.Insert your knife about 1/8 inch from the line of pith and gently slice towards the center. Do the same on the other side of the segment, 1/8 inch away from the pith. At this point the segment should gently slide out from the fruit. If it doesn’t repeat your cuts going slightly deeper in the center of the fruit and angling the cuts towards one another until they meet in the middle, freeing the segment.
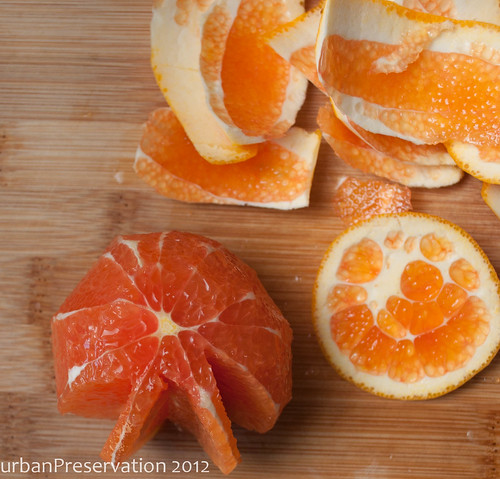
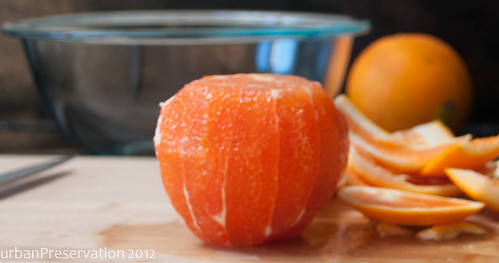
Step 5.Continue to remove segments by slicing them on both sides and removing while leaving the skin between segments intact. The final product will be juicy segments of citrus and a pinwheel shaped remainder of the original fruit.
The empty remains of the fruit can be squeeze for additional juice that is often a good addition to whatever dish you're making with the segments. Or it can be saved for sweet addition to a vinaigrette. Or put straight into a glass and enjoyed.
When learning new techniques in the kitchen, I always like to weigh the complexity of the task against the difficulty the name suggests. The more impressive the name and the easier the task, the more likely I am to accomplish it. Supreme (rhymes with “pants hem”) is a fancy word for an incredibly useful technique that is not actually particularly complicated but makes people ooh and ahh when you talk about it. The end result is clean citrus slices without any bitter skin or seeds that can be easily added to salads, fruit tarts, jams, and sauces. The remaining segment-less piece of citrus can also be juiced for some additional flavor. I like to add finely chopped supremed lemon to quinoa to perk up the flavor. Or just add them to my morning yogurt. This fancy technique needs no special occasion.
You’ll need
At least 1 piece of citrus - orange, lime, lemon, grapefruit, all have excellent uses
A relatively sharp knife
Hands free of cuts and hangnails or the juice will sting – Alternatively wear non-latex gloves. I keep them around for working with chiles as well.
Step 1. Cut off the top and bottom – stem and blossom ends - of the citrus you’re working with so that it will sit flat on a cutting board.
Step 2. Starting from the top and working around the natural curve of the fruit, slice away strips of the peel and pith so that the flesh of the fruit is exposed. You may cut away a large amount of fruit in the beginning but better waste some fruit than leave pith on the finished product.I find that it’s often helpful to turn the fruit upside down after cutting away all the peel, to make sure all the pith is removed as well - unlike in the picture below. The curve of the orange can hide spots.
Step 3. Holding the citrus in your hand, identify the segments of the citrus, separated by a thin white line created by the skin separating the segments.
Step 4.Insert your knife about 1/8 inch from the line of pith and gently slice towards the center. Do the same on the other side of the segment, 1/8 inch away from the pith. At this point the segment should gently slide out from the fruit. If it doesn’t repeat your cuts going slightly deeper in the center of the fruit and angling the cuts towards one another until they meet in the middle, freeing the segment.
Step 5.Continue to remove segments by slicing them on both sides and removing while leaving the skin between segments intact. The final product will be juicy segments of citrus and a pinwheel shaped remainder of the original fruit.
The empty remains of the fruit can be squeeze for additional juice that is often a good addition to whatever dish you're making with the segments. Or it can be saved for sweet addition to a vinaigrette. Or put straight into a glass and enjoyed.
Thursday, January 26, 2012
Romesco Sauce
One of the first things people say when coming to my house for the first time is, “wow, you have a lot of cookbooks.” Which is absolutely true. My apartment has two bookcases and three shelves are dedicated to cookbooks. Maybe four of them belong to my roommate. Jeff and I get a lot of cookbooks as presents and we also buy a lot of them at thrift sales and used book stores. But on any given day when I’m looking around for what to make for dinner, I rarely crack open a cookbook and if I do it’s even more rare that I follow the recipe.
Don’t let this confession make you think that my cookbooks sit on the shelf gathering dust. I use them all the time just perhaps not for what most people do. I use about 5% of my cookbooks and the rest I just fish out the sauce-type recipes and make those over and over. By the time I get around to making a meal, I’m often too tired to go out and get any missing ingredients or learn a complicated new method. But by taking the sauce recipes and adding them to my already-tried techniques I could get a whole new dish with fewer complications. And I could arguably claim to be using my cookbooks and thus justify their ever growing number. Perfect.
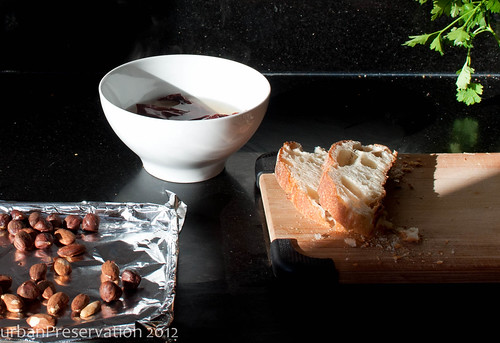
This is how I fell in love with Romesco sauce, a recipe that came from one of my fanciest cookbooks and which is incredibly easy to make. It uses a lot of odds and ends – a few almonds and hazelnuts, the ends of a loaf of bread toasted golden, and that annoyingly small amount of canned tomatoes left from another experiment. And the end result is much, much more than the sum of its parts. It has a dark and earthy flavor from all the dried chilis and because it is doesn’t require emulsification it can be easily thinned out to create a marinade without creating an oily mess.
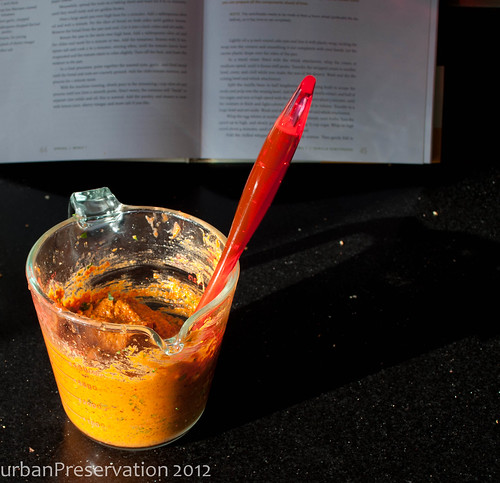
The recipe is pretty high in ingredients but don’t let that keep you from making it, especially since it’s mostly a toast-blend-and-serve kind of thing. It’s endlessly versatile – the original recipe it came from called for the sauce to be served on potatoes (an excellent choice) but I also spread it on bread, add it to hummus or yogurt sauce, use it to marinate meat or fish, scramble it into eggs, and drizzle it on roasted vegetables. A jar of it will keep in the fridge for up to three weeks but why wait that long? I find a well made sauce can perk up just about any meal and turn it from weeknight-standby to new-and-delicious, in about 3 tablespoons.

Romesco Sauce
Lightly adapted from Sunday Suppers at Lucques by Suzanne Goin
Makes 1-2 cups of sauce, depending on thickness.
5 dried ancho chiles – you can substitute New Mexico, pasilla, California/Anaheim, or guajillo chiles
2 tbs raw almonds
2 tbs raw hazelnuts
4 tbs plus 1 cup olive oil
1 slice white bread – any will do – about 1 inch thick
1/3 cup canned tomatoes
1 clove garlic, chopped
1 tbs chopped flat-leaf or Italian parsley
Juice of half a lemon
Salt to taste, about 2 tsp
Preheat oven or toaster oven to 375F. Spread nuts on a baking sheet and toast for 8-10 minutes until they are golden brown and aromatic.*
Remove and discard the stems and seeds of the chiles. Soak them in warm water for about 15 minutes to soften. Strain and pat dry.
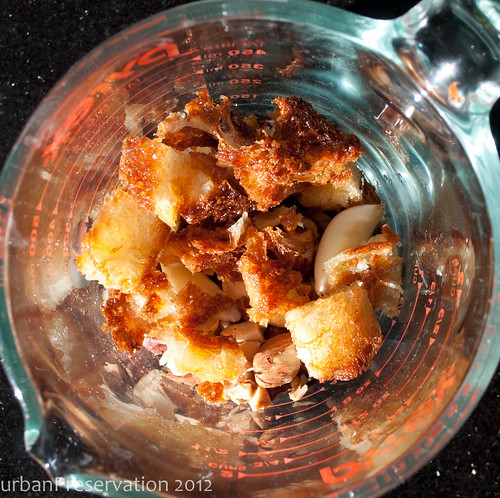
Heat a large sauce pan on high heat with 2 tbs of olive oil. Fry the slice of bread on both sides until a deep golden brown. Remove and cut into one inch cubes.
Keep the pan on high heat and add 2 more tbs of olive oil to the pan and add the chiles and sauté until they blister slightly, about 5 minutes. Add the tomatoes and season with ½ tsp of salt. Cook until tomato juices have mostly evaporated. Turn off heat and let cool slightly.
In a food processor, blender, or with an immersion blender, pulse the toasted nuts, garlic, and bread until coarsely ground. Add the chile/tomato mixture, parsley, and lemon juice and process until smooth and well distributed.
With the motor running add olive oil, up to one cup until the sauce reaches your desired texture.** The sauce may separate into oils and solids – that is normal and it will mix back together with about a minute of blending. Taste to adjust seasoning. Refrigerate for up to three weeks.
*You can skip this step entirely and use roasted nuts instead. I like the extra toasty flavor but it doesn’t make a big difference.
** I prefer to add only ¼ cup of oil and keep it more like a paste because I find it’s easier to use that way. If I need it to be thinner for a marinade, I thin out only the amount I’m using.
Don’t let this confession make you think that my cookbooks sit on the shelf gathering dust. I use them all the time just perhaps not for what most people do. I use about 5% of my cookbooks and the rest I just fish out the sauce-type recipes and make those over and over. By the time I get around to making a meal, I’m often too tired to go out and get any missing ingredients or learn a complicated new method. But by taking the sauce recipes and adding them to my already-tried techniques I could get a whole new dish with fewer complications. And I could arguably claim to be using my cookbooks and thus justify their ever growing number. Perfect.
This is how I fell in love with Romesco sauce, a recipe that came from one of my fanciest cookbooks and which is incredibly easy to make. It uses a lot of odds and ends – a few almonds and hazelnuts, the ends of a loaf of bread toasted golden, and that annoyingly small amount of canned tomatoes left from another experiment. And the end result is much, much more than the sum of its parts. It has a dark and earthy flavor from all the dried chilis and because it is doesn’t require emulsification it can be easily thinned out to create a marinade without creating an oily mess.
The recipe is pretty high in ingredients but don’t let that keep you from making it, especially since it’s mostly a toast-blend-and-serve kind of thing. It’s endlessly versatile – the original recipe it came from called for the sauce to be served on potatoes (an excellent choice) but I also spread it on bread, add it to hummus or yogurt sauce, use it to marinate meat or fish, scramble it into eggs, and drizzle it on roasted vegetables. A jar of it will keep in the fridge for up to three weeks but why wait that long? I find a well made sauce can perk up just about any meal and turn it from weeknight-standby to new-and-delicious, in about 3 tablespoons.
Romesco Sauce
Lightly adapted from Sunday Suppers at Lucques by Suzanne Goin
Makes 1-2 cups of sauce, depending on thickness.
5 dried ancho chiles – you can substitute New Mexico, pasilla, California/Anaheim, or guajillo chiles
2 tbs raw almonds
2 tbs raw hazelnuts
4 tbs plus 1 cup olive oil
1 slice white bread – any will do – about 1 inch thick
1/3 cup canned tomatoes
1 clove garlic, chopped
1 tbs chopped flat-leaf or Italian parsley
Juice of half a lemon
Salt to taste, about 2 tsp
Preheat oven or toaster oven to 375F. Spread nuts on a baking sheet and toast for 8-10 minutes until they are golden brown and aromatic.*
Remove and discard the stems and seeds of the chiles. Soak them in warm water for about 15 minutes to soften. Strain and pat dry.
Heat a large sauce pan on high heat with 2 tbs of olive oil. Fry the slice of bread on both sides until a deep golden brown. Remove and cut into one inch cubes.
Keep the pan on high heat and add 2 more tbs of olive oil to the pan and add the chiles and sauté until they blister slightly, about 5 minutes. Add the tomatoes and season with ½ tsp of salt. Cook until tomato juices have mostly evaporated. Turn off heat and let cool slightly.
In a food processor, blender, or with an immersion blender, pulse the toasted nuts, garlic, and bread until coarsely ground. Add the chile/tomato mixture, parsley, and lemon juice and process until smooth and well distributed.
With the motor running add olive oil, up to one cup until the sauce reaches your desired texture.** The sauce may separate into oils and solids – that is normal and it will mix back together with about a minute of blending. Taste to adjust seasoning. Refrigerate for up to three weeks.
*You can skip this step entirely and use roasted nuts instead. I like the extra toasty flavor but it doesn’t make a big difference.
** I prefer to add only ¼ cup of oil and keep it more like a paste because I find it’s easier to use that way. If I need it to be thinner for a marinade, I thin out only the amount I’m using.
Wednesday, January 25, 2012
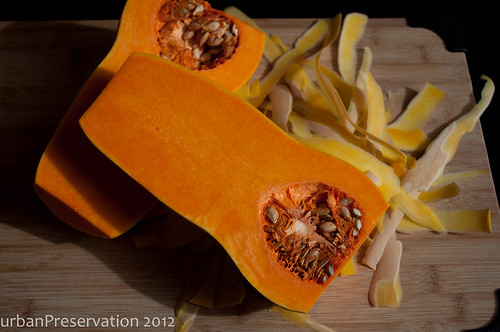
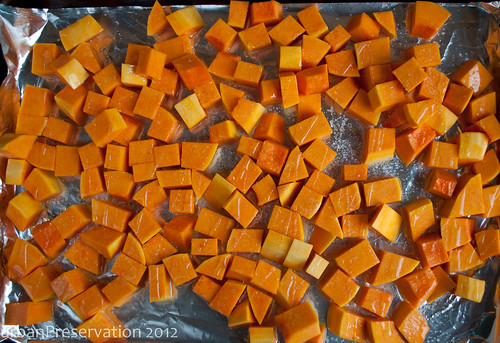
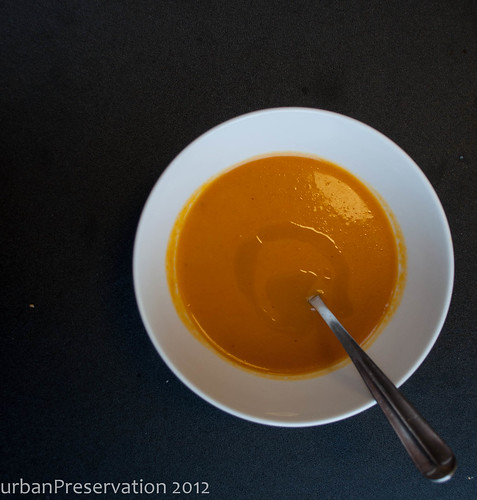
Butternut Squash Soup
The weather here has been cold and gray and partly rainy since last week and that means all I want to do is eat soup. To my mind, there are two kinds of soup. There’s the kind that is chock full of things – potatoes, carrots, noodles, meat, maybe some barley or rice. Soup so full of bits and pieces that you could almost skip the broth entirely. Then there’s soup that is only liquid, made of only a few ingredients but so intensely flavored by those few that you scrape the bowl to get every last drop.
I love ordering this second kind of soup in restaurants – it’s so rich and smooth, obviously full of butter and requiring annoying amounts of time. At home I stuck to the soups with lots of pieces of vegetable, meat, and grains, until recently when I discovered a surprising trick to homemade soup. In The French Laundry Cookbook, of which I own a well loved (read: stained) copy, there’s a small ode to soups and how they’re made. For a man known for extremely complex dishes with many, many steps, Thomas Keller’s approach to soup is fascinatingly simple: “Identify your ingredient, cook it perfectly, and adjust the consistency.” Perhaps the “perfectly” is not so simple to achieve but the idea of good soup coming from careful preparation of one or two ingredients caught my eye and I started experimenting with this principle.

The recipe below is for butternut squash soup but it can easily be adapted for just about any vegetable whose flavor improves with roasting (cauliflower, parsnips, broccoli, carrots). The overall method remains pretty much the same – cook the vegetable to the desired taste, puree it, and thin it with water or stock. While the French Laundry method requires straining the resulting puree several times through progressively smaller straining devices, I’m not looking for perfection in my kitchen, just comfort and deliciousness. If I’m feeling industrious I might pass the vegetables through a food mill or my fancy chinois. But normally I just blend them for a few minutes on high using my immersion blender and call it a day. You can add cream for the additional flavor and body but it mutes the flavor of the vegetables, as will butter. I like to keep things simple by adding just a drizzle of oil to my bowl at the table.
For added flavor during cooking my favorite low-cost flavor addition to homemade soup is Parmesan rinds. I save the ends of all my Parmesan wedges after I’ve grated them to the bone and then throw one or two into soups. It adds an extra flavor without the unpleasant graininess that can happen when you put cheese in soup and let it simmer for a while. However, the soup can easily be made vegan by omitting the rinds and still tastes excellent on its own. As a low maintenance recipe with high quality output this soup is something I can really get behind when the weather turns gray. A hot bowl served with some thick bread or a crisp salad is really all it takes at the end of gray day to make things look sunnier. Maybe some slippers too.
Butternut squash soup
Method adapted from the French Laundry Cookbook
Makes 3-4 servings, depending on your preferred texture.
1 large butternut squash, about 3-4 pounds
2-3 tbs olive oil
1 tbs kosher salt
2-4 cups stock or water, more if needed
2 parmesan rinds
Salt and pepper to taste
Good quality oil for serving
Preheat oven to 425F. Peel and chop squash into approximately 1 inch chunks. Line a baking sheet with foil and oil it lightly with about 1 tbs of olive oil to prevent sticking. Arrange squash on the pan, making sure each piece is resting on the sheet, not on it’s neighbor. Drizzle with remaining oil and sprinkle with 1 tbs salt. Roast for 1hour, tossing the squash halfway through to ensure that it cooks evenly and doesn’t burn on the side touching the pan.
While the squash is still warm, puree using a food processor, food mill, blender, or immersion blender. For a smoother texture, pass the resulting puree through a fine-mesh strainer or chinois. Place the vegetable puree in a large pot and add liquid until it reaches desired consistency. Place the pot on low heat, add parmesan rinds, and simmer for at least 30 minutes. If left longer, cover the soup to prevent excess loss of moisture. Taste after 30 minutes and season with salt and pepper until it reaches the desired flavor. Discard rinds before serving. Serve with a drizzle of good quality oil and some chewy bread or a salad for an easy rainy day meal.
I love ordering this second kind of soup in restaurants – it’s so rich and smooth, obviously full of butter and requiring annoying amounts of time. At home I stuck to the soups with lots of pieces of vegetable, meat, and grains, until recently when I discovered a surprising trick to homemade soup. In The French Laundry Cookbook, of which I own a well loved (read: stained) copy, there’s a small ode to soups and how they’re made. For a man known for extremely complex dishes with many, many steps, Thomas Keller’s approach to soup is fascinatingly simple: “Identify your ingredient, cook it perfectly, and adjust the consistency.” Perhaps the “perfectly” is not so simple to achieve but the idea of good soup coming from careful preparation of one or two ingredients caught my eye and I started experimenting with this principle.
The recipe below is for butternut squash soup but it can easily be adapted for just about any vegetable whose flavor improves with roasting (cauliflower, parsnips, broccoli, carrots). The overall method remains pretty much the same – cook the vegetable to the desired taste, puree it, and thin it with water or stock. While the French Laundry method requires straining the resulting puree several times through progressively smaller straining devices, I’m not looking for perfection in my kitchen, just comfort and deliciousness. If I’m feeling industrious I might pass the vegetables through a food mill or my fancy chinois. But normally I just blend them for a few minutes on high using my immersion blender and call it a day. You can add cream for the additional flavor and body but it mutes the flavor of the vegetables, as will butter. I like to keep things simple by adding just a drizzle of oil to my bowl at the table.
For added flavor during cooking my favorite low-cost flavor addition to homemade soup is Parmesan rinds. I save the ends of all my Parmesan wedges after I’ve grated them to the bone and then throw one or two into soups. It adds an extra flavor without the unpleasant graininess that can happen when you put cheese in soup and let it simmer for a while. However, the soup can easily be made vegan by omitting the rinds and still tastes excellent on its own. As a low maintenance recipe with high quality output this soup is something I can really get behind when the weather turns gray. A hot bowl served with some thick bread or a crisp salad is really all it takes at the end of gray day to make things look sunnier. Maybe some slippers too.
Butternut squash soup
Method adapted from the French Laundry Cookbook
Makes 3-4 servings, depending on your preferred texture.
1 large butternut squash, about 3-4 pounds
2-3 tbs olive oil
1 tbs kosher salt
2-4 cups stock or water, more if needed
2 parmesan rinds
Salt and pepper to taste
Good quality oil for serving
Preheat oven to 425F. Peel and chop squash into approximately 1 inch chunks. Line a baking sheet with foil and oil it lightly with about 1 tbs of olive oil to prevent sticking. Arrange squash on the pan, making sure each piece is resting on the sheet, not on it’s neighbor. Drizzle with remaining oil and sprinkle with 1 tbs salt. Roast for 1hour, tossing the squash halfway through to ensure that it cooks evenly and doesn’t burn on the side touching the pan.
While the squash is still warm, puree using a food processor, food mill, blender, or immersion blender. For a smoother texture, pass the resulting puree through a fine-mesh strainer or chinois. Place the vegetable puree in a large pot and add liquid until it reaches desired consistency. Place the pot on low heat, add parmesan rinds, and simmer for at least 30 minutes. If left longer, cover the soup to prevent excess loss of moisture. Taste after 30 minutes and season with salt and pepper until it reaches the desired flavor. Discard rinds before serving. Serve with a drizzle of good quality oil and some chewy bread or a salad for an easy rainy day meal.
Tuesday, January 24, 2012
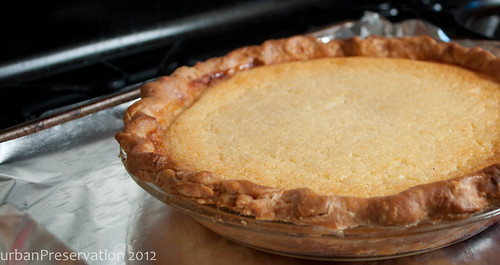
Chess Pie
I have a tendency to make unusual word associations, often involving food. Certain words remind me of food and then I have this strange imagery inserted into whatever conversation I’m having. For example, the word “extraordinary” always makes me think of “strawberry.” I’ve found that in conversation, “extraordinary” is often said right before the word “achievement” and then I have this image of a strawberry with a gold star while everyone else is talking about meeting fundraising goals in record time or something of that nature. Strange? Perhaps. Worrying? Never.

A few weeks ago I was playing an ultimate frisbee tournament with a team named “Occupy Sesame Street.” And as tradition goes, right before we took the field each game we would form a huddle and cheer and generally our cheer would be “Occupy.” The team played a total of 6 games over two days and somewhere around game 3 I started to hear “Occu-PIE.” Every time we broke from our huddle all I could think was, “Mmm, pie.” At one point I even asked the team if they heard it too – everyone kind of looked at me like I had grown a new head and then we all laughed it off and I didn’t mention it again. But all weekend I kept thinking of pie and how I could get some.

Here’s the problem: I will not buy a slice of pie with mediocre crust. I just can’t do it. So if I want pie I am often forced to make it for myself. I know. My life is just so hard. But I must say, you do an excellent job playing such a small violin.

I lasted approximately three hours after getting home from the tournament, if you don’t include the time I spent sleeping, before I made myself a pie. I woke up, opened the fridge to find some breakfast, saw a half container of leftover buttermilk, and immediately started thinking about chess pie. Chess pie, for the Yankees among you who have never experienced this Southern delight, is a custard pie flavored with lemon or vinegar. It’s pretty typical in the South but not so common above the Mason-Dixon line and I think it’s time to expose that delicious secret. This is a one bowl pie, not including the crust , and it takes about ten minutes to throw the filling together if you spend five of them looking for the ingredients in the fridge. And the result is delicious – silky delicate custard with just enough sweetness countered by the tang of buttermilk and lemon. This pie is also best served the day it’s baked so invite over a few friends and share it around. Or don’t. I won’t tell.

Chess Pie
From the Pie and Pastry Bible by Rose Levy Beranbaum
1 recipe flaky piecrust
1 egg white
3 eggs
1 ½ tsp cornstarch
1 cup sugar
1 ½ cups buttermilk
1 stick (8 tbs) butter, melted and cooled
2 tsp lemon zest
Juice of half a lemon (approximately 1-2 tbs)
½ tsp nutmeg
1 tsp salt
Preheat oven to 425F for at least 20 minutes so that it is uniformly hot. Roll out pie dough and arrange it in the pie pan. Place a piece of parchment or oiled tinfoil on the unbaked shell and fill with pie beans or pie weights.* Bake for 20 minutes. Then remove the beans or weights and lightly prick the crust with a fork, making sure the tines only go halfway through the dough so the filling won’t leak. Continue baking crust for 5-10 minutes until it pale golden brown. Check it halfway through and prick it again if the dough begins to bubble up. Remove the prebaked crust from the oven and when it has cooled slightly but is still warm, brush it with egg white.** Let crust cool to room temperature.
Preheat oven to 325F and place an oven rack on the lowest level of the oven. Put a foil lined baking sheet on the rack to preheat with the oven.
In a large bowl, combine egg, cornstarch, and sugar and whisk until well mixed. Beat in buttermilk, alternating with the melted butter, in several parts. Beat in the lemon zest and juice, nutmeg, and salt. Pour the filling into the dough and bake for one hour or until surface is lightly browned and filling is set. The filling will jiggle slightly when moved but will not stick to your finger when lightly pressed. A knife inserted between the crust and filling should come out clean. Serve at room temperature
*I use a half pound of black beans that I keep in a bag clearly marked “pie beans” so that I don’t accidentally try to cook them.
** Egg white will create a shield so that the wet filling won’t make the bottom crust soggy.
Monday, January 23, 2012
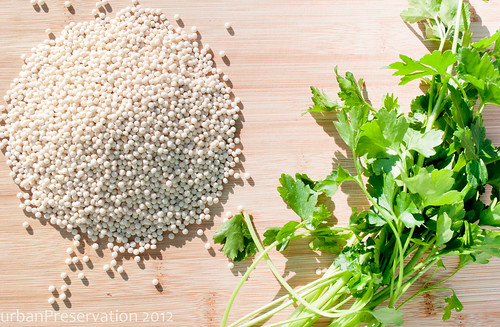
Chimichurri Couscous
Parsley gets a bit of a bad rap. It’s so often the unfortunate garnish or the superfluous ingredient that people seem to dismiss it as a serious ingredient. For years when a recipe called for parsley I would like as not skip it. I saw no real point in using parsley, other than for color. Also at fault are some horrible memories I have of eating (or at least attempting to eat) curly parsley while feeling like my mouth was full of plastic toothpick frills.
Then I fell in love with chimichurri sauce. I loved the tang and the heat, but mostly I loved the clean, grassy, herbal flavor of the parsley that makes up the majority of the sauce. There are of course about as many variations of chimichurri as there are people who make it, but most recipes agree that parsley plays a key role, if not the sole herbal element. So when my roommate bought an extra bunch of parsley and asked if I wanted to use it, I had a good idea where it was going to end up.
Chimichurri as a sauce on already cooked foods is great but as a dressing for an Israeli couscous salad it leaves sometimes to be desired. The chile flakes that distribute heat so well through the oil and vinegar provide an uneven heat when mixed into a salad. Some bites have too much heat, some none at all. The raw garlic that’s traditional in chimichurri also doesn’t play nice in a room temperature salad. Without something rich and fatty to cut through, the sharpness of the garlic tends to overwhelm just about everything, including my breath for the next day or so. Those flavors are still really important to the finished product so I gave them both a bit of a pick me up to help them meld better in the final dish.

To tackle the chile flakes I infused them into some neutral oil to mix into the final dish. Infused oil is a great way to evenly distribute a dried herb throughout a salad. Add the herbs to cold oil and put it over medium heat for a few minutes until the oil takes on the scent of the herb. Then strain it and bottle it for future use. The chile oil added a nice even heat to the couscous and it doesn’t hurt that the dried chile flakes dye the oil a brilliant orange. To mellow the garlic I used roasted cloves instead of fresh which added the garlic flavor without the sharp sting. Even if you’re not making this dish, roasted garlic is a great thing to have around to add to recipes or just to spread on good bread with some quality olive oil. Additionally, the soft garlic can be a great addition to salad dressing since it will dissolve into the vinegar with a little whisking.
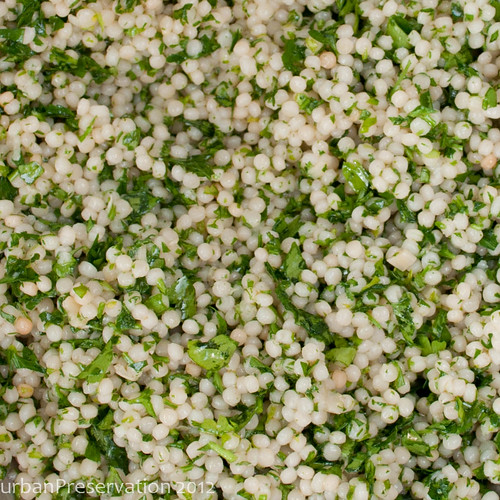
The final dish has a good amount of heat and some sweet nuttiness from the roasted garlic, but it’s the parsley that really steals the show. Green and herbal, it’s a great example of how an overlooked ingredient can make a huge difference in a dish.
Note: I made this with Israeli couscous because it’s what I had around the house. Would it be equally delicious with other grains, including regular couscous, barley, farro, quinoa, and pasta? You bet.
Chimichurri Couscous
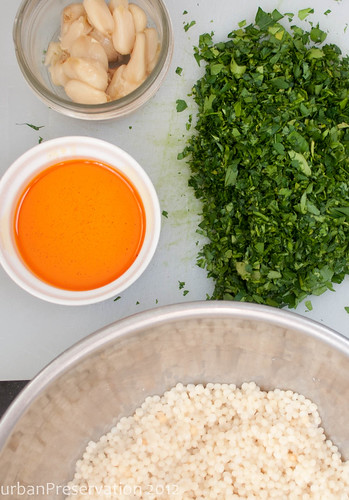
1 cup uncooked Israeli couscous
2 cups water or chicken stock
1 tbs salt + additional for seasoning
1/3 cup neutral oil, such as canola or safflower
1 tbs red chile flakes
¼ cup red wine vinegar
4-6 cloves roasted garlic (recipe below)
1 large bunch flat leaf or Italian parsley, finely minced
Bring the water or stock to a boil in a medium pot and add the Israeli couscous and the salt. Stir in the couscous and cook for 6-8 minutes or until couscous is tender all the way through. Drain and set aside.
Place the oil in a small pot and add the chile flakes to the cold oil. Place it over medium low heat and cook for 5 minutes or until oil takes on the scent of the chile flakes and turns a bright orange color. The longer it cooks the spicier the oil but avoid burning the chile flakes which will make the oil bitter. When oil reaches the desired spice level, take it off the heat and strain out the chile flakes.
Mash garlic cloves into vinegar and whisk until garlic is fully incorporated. Mix vinegar/garlic mixture with oil to create a loose vinaigrette. Combine vinaigrette, couscous, and parsley and stir to distribute evenly. Taste to adjust seasoning. Serve warm or at room temperature.
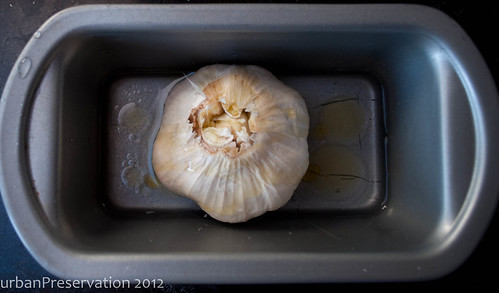
Easy Roasted Garlic
1 head raw garlic
2 tbs olive oil
Preheat your oven to 400F. Place the garlic in a small baking dish and add water to come a quarter inch up the side of the dish.* Pour the olive oil over the garlic head and cover with foil. Roast for 1 hour or until garlic cloves are soft to the touch. Let cool and peel cloves. Store peeled cloves in a well sealed container in the fridge. Avoid plastic if possible because it can hold the smell of garlic even after washing.
*Roasting the garlic in a small amount of water prevent the bottom of the garlic from burning and adding a bitter flavor to the roasted cloves.
Then I fell in love with chimichurri sauce. I loved the tang and the heat, but mostly I loved the clean, grassy, herbal flavor of the parsley that makes up the majority of the sauce. There are of course about as many variations of chimichurri as there are people who make it, but most recipes agree that parsley plays a key role, if not the sole herbal element. So when my roommate bought an extra bunch of parsley and asked if I wanted to use it, I had a good idea where it was going to end up.
Chimichurri as a sauce on already cooked foods is great but as a dressing for an Israeli couscous salad it leaves sometimes to be desired. The chile flakes that distribute heat so well through the oil and vinegar provide an uneven heat when mixed into a salad. Some bites have too much heat, some none at all. The raw garlic that’s traditional in chimichurri also doesn’t play nice in a room temperature salad. Without something rich and fatty to cut through, the sharpness of the garlic tends to overwhelm just about everything, including my breath for the next day or so. Those flavors are still really important to the finished product so I gave them both a bit of a pick me up to help them meld better in the final dish.
To tackle the chile flakes I infused them into some neutral oil to mix into the final dish. Infused oil is a great way to evenly distribute a dried herb throughout a salad. Add the herbs to cold oil and put it over medium heat for a few minutes until the oil takes on the scent of the herb. Then strain it and bottle it for future use. The chile oil added a nice even heat to the couscous and it doesn’t hurt that the dried chile flakes dye the oil a brilliant orange. To mellow the garlic I used roasted cloves instead of fresh which added the garlic flavor without the sharp sting. Even if you’re not making this dish, roasted garlic is a great thing to have around to add to recipes or just to spread on good bread with some quality olive oil. Additionally, the soft garlic can be a great addition to salad dressing since it will dissolve into the vinegar with a little whisking.
The final dish has a good amount of heat and some sweet nuttiness from the roasted garlic, but it’s the parsley that really steals the show. Green and herbal, it’s a great example of how an overlooked ingredient can make a huge difference in a dish.
Note: I made this with Israeli couscous because it’s what I had around the house. Would it be equally delicious with other grains, including regular couscous, barley, farro, quinoa, and pasta? You bet.
Chimichurri Couscous
1 cup uncooked Israeli couscous
2 cups water or chicken stock
1 tbs salt + additional for seasoning
1/3 cup neutral oil, such as canola or safflower
1 tbs red chile flakes
¼ cup red wine vinegar
4-6 cloves roasted garlic (recipe below)
1 large bunch flat leaf or Italian parsley, finely minced
Bring the water or stock to a boil in a medium pot and add the Israeli couscous and the salt. Stir in the couscous and cook for 6-8 minutes or until couscous is tender all the way through. Drain and set aside.
Place the oil in a small pot and add the chile flakes to the cold oil. Place it over medium low heat and cook for 5 minutes or until oil takes on the scent of the chile flakes and turns a bright orange color. The longer it cooks the spicier the oil but avoid burning the chile flakes which will make the oil bitter. When oil reaches the desired spice level, take it off the heat and strain out the chile flakes.
Mash garlic cloves into vinegar and whisk until garlic is fully incorporated. Mix vinegar/garlic mixture with oil to create a loose vinaigrette. Combine vinaigrette, couscous, and parsley and stir to distribute evenly. Taste to adjust seasoning. Serve warm or at room temperature.
Easy Roasted Garlic
1 head raw garlic
2 tbs olive oil
Preheat your oven to 400F. Place the garlic in a small baking dish and add water to come a quarter inch up the side of the dish.* Pour the olive oil over the garlic head and cover with foil. Roast for 1 hour or until garlic cloves are soft to the touch. Let cool and peel cloves. Store peeled cloves in a well sealed container in the fridge. Avoid plastic if possible because it can hold the smell of garlic even after washing.
*Roasting the garlic in a small amount of water prevent the bottom of the garlic from burning and adding a bitter flavor to the roasted cloves.
Friday, January 20, 2012
How To - Flaky Piecrust
Ahh, pie crust. Pie dough is one of those things that is pretty good from a package. But well done homemade pie dough can take a pie from “this is good pie” to “this pie is amazing.” I make a pretty mean pie crust. And there’s no reason you shouldn’t too. Don’t know how? Well this is your lucky day.
“This pie crust is so good that it makes anyone who uses store bought pie crust look like someone who doesn’t know how to make pie crust.” – Michael Tyler Frederickson.
Nicely said! Added bonus, when you make this pie dough you know exactly what goes into it. And it doesn’t include Yellow 5 or Red 40 or preservatives. Unless you’re into that thing. In which case this recipe will not help. But for the rest of us, let’s begin.
You’ll need:
1 stick (8 tbs) cold butter
1 cup flour, sift before measuring – this part is really important for consistent results! It minimizes differences in the amount measured due to how tightly the flour is packed.
1 tsp kosher salt
1 tbs apple cider vinegar - makes the crust more tender and relaxes the gluten formed while mixing.
Up to 1/3 cup of water, added 2 tbs at a time.
Step 1: Place the flour and salt in a mixing bowl and add the butter, cut in slices. Mix the flour/salt and butter together using just your fingers. Don’t use your whole hand to do the mixing since your palms are usually pretty warm and you want to keep the butter as cold as possible. Mix until most of the flour has at least some butter on it but there are still some large chunks of butter hanging around. Those big pieces are essential to lovely flaky layers so err on the side of undermixing.

Step 2: Add the vinegar and then add water a few tablespoons at a time until the flour comes together into a dough. It should all stick together but it shouldn’t stick to the bowl or to your hands when you press it.
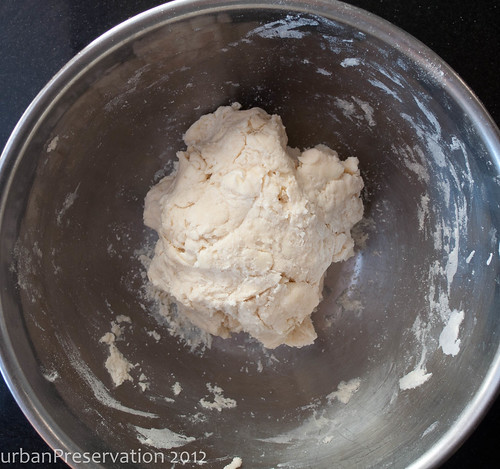
Step 3: Place the dough on a piece of plastic wrap and flatten it with your hands into a disc about 6 inches across. This can also be a last minute check for stickiness. If the dough sticks to your fingers when you press it out, sprinkle it with a little extra four, then wrap it up. Let the dough rest for at least 30 minutes. You can even make the dough a few days ahead and leave it in the fridge or freeze it for up to a month before using.
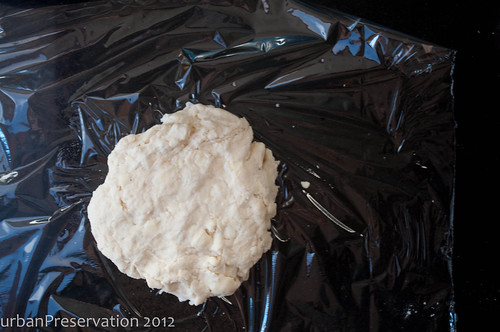
Step 4: Roll it out so that it’s about an inch or two bigger than your pie pan on all sides. This part will be important for sealing the top crust or making a pretty crimped edge. And those lovely big pieces of butter in the dough? Those are going to make some nice flaky pastry!
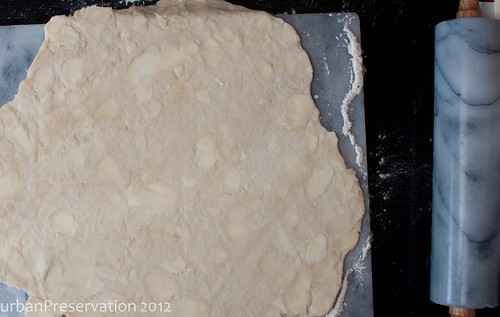
Step 5: The best way I’ve found to transfer dough is sprinkle extra flour on top, fold it into quarters, then place it so the tip of the triangle is in the center of the pie pan and unfold. Works like a charm.
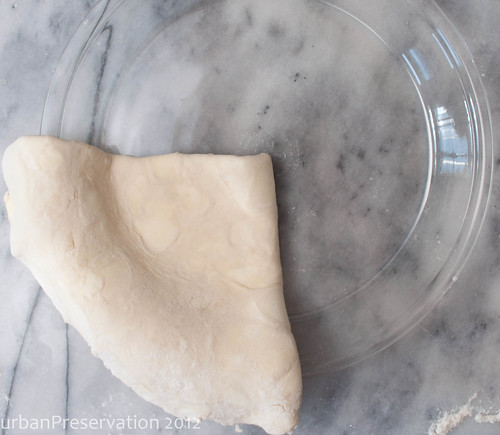
Bonus step: Crimp the edges by folding that extra inch of dough under so you now have a double layer of dough on the rim of the pie pan with the edge hidden under the dough. If some areas of the dough are longer, rip that piece off and use it to patch a shorter piece. To get that traditional crimp place your index finger and middle finger on the outer edge of the dough about a half inch apart and your thumb on the inner edge of the dough between them. Pinch lightly. Now move your index finger to the indent made by your middle finger and repeat. End result, a beautifully crimped edge.
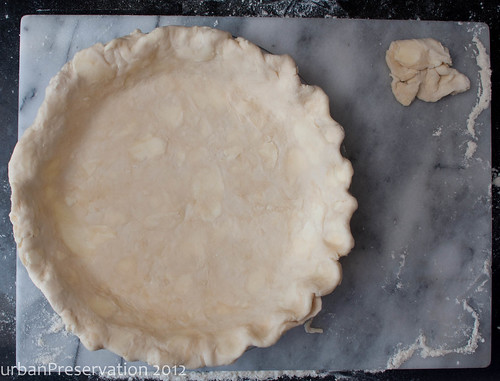
Use with your favorite pie recipe. Also with your second favorites. Try this one. Wow your friends. Tell them, “It was easy.” Right?
“This pie crust is so good that it makes anyone who uses store bought pie crust look like someone who doesn’t know how to make pie crust.” – Michael Tyler Frederickson.
Nicely said! Added bonus, when you make this pie dough you know exactly what goes into it. And it doesn’t include Yellow 5 or Red 40 or preservatives. Unless you’re into that thing. In which case this recipe will not help. But for the rest of us, let’s begin.
You’ll need:
1 stick (8 tbs) cold butter
1 cup flour, sift before measuring – this part is really important for consistent results! It minimizes differences in the amount measured due to how tightly the flour is packed.
1 tsp kosher salt
1 tbs apple cider vinegar - makes the crust more tender and relaxes the gluten formed while mixing.
Up to 1/3 cup of water, added 2 tbs at a time.
Step 1: Place the flour and salt in a mixing bowl and add the butter, cut in slices. Mix the flour/salt and butter together using just your fingers. Don’t use your whole hand to do the mixing since your palms are usually pretty warm and you want to keep the butter as cold as possible. Mix until most of the flour has at least some butter on it but there are still some large chunks of butter hanging around. Those big pieces are essential to lovely flaky layers so err on the side of undermixing.
Step 2: Add the vinegar and then add water a few tablespoons at a time until the flour comes together into a dough. It should all stick together but it shouldn’t stick to the bowl or to your hands when you press it.
Step 3: Place the dough on a piece of plastic wrap and flatten it with your hands into a disc about 6 inches across. This can also be a last minute check for stickiness. If the dough sticks to your fingers when you press it out, sprinkle it with a little extra four, then wrap it up. Let the dough rest for at least 30 minutes. You can even make the dough a few days ahead and leave it in the fridge or freeze it for up to a month before using.
Step 4: Roll it out so that it’s about an inch or two bigger than your pie pan on all sides. This part will be important for sealing the top crust or making a pretty crimped edge. And those lovely big pieces of butter in the dough? Those are going to make some nice flaky pastry!
Step 5: The best way I’ve found to transfer dough is sprinkle extra flour on top, fold it into quarters, then place it so the tip of the triangle is in the center of the pie pan and unfold. Works like a charm.
Bonus step: Crimp the edges by folding that extra inch of dough under so you now have a double layer of dough on the rim of the pie pan with the edge hidden under the dough. If some areas of the dough are longer, rip that piece off and use it to patch a shorter piece. To get that traditional crimp place your index finger and middle finger on the outer edge of the dough about a half inch apart and your thumb on the inner edge of the dough between them. Pinch lightly. Now move your index finger to the indent made by your middle finger and repeat. End result, a beautifully crimped edge.
Use with your favorite pie recipe. Also with your second favorites. Try this one. Wow your friends. Tell them, “It was easy.” Right?
Subscribe to:
Posts (Atom)